I'm so pleased to read your comments. I love hearing from readers! But I have tried to reply to several of you today, only to see that you are "no reply bloggers". Now I respect the fact that you are entitled to your privacy! Really, I do! But I think that most "no reply" people don't realize that their settings are what they are.
I always try to send an email reply to everyone who comments to one of my blog posts. (Sometimes I get overwhelmed, but I do try).. If you commented and didn't hear from me, there's a good chance that you have your privacy settings such that I can't contact you.
SOOOOO..... if you win...... I can't send you an email! This is ok with me, but if a no-reply person wins, I'll post their name in a blog post- and if they don't happen to see it and contact me in a few days, I'll have to select another winner.
Make sure I can reply to you.... or make sure you check back on ANY blog if you enter a drawing.
This is just a thought.... but if you really don't want your email address out there on the internet, and if you like to keep your email uncluttered, you might consider opening a different email account (a free one like yahoo or gmail or many others). Then just keep that one for "junk" or newsletters and blog posts. A lot of people do that. (Just make sure you check it once in a while, though!)
Wednesday, December 31, 2014
Giveaway- Tradewinds Pattern (Ends Jan 15, 2015)
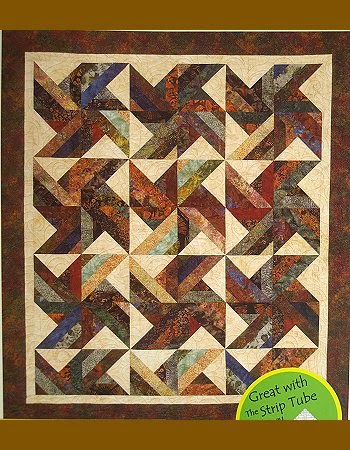
For the month of January, I'll putting this pattern and the Strip Tube Ruler on sale on my website.
There are lots of ways to gain entries. For one entry in the drawing, all you have to do is comment to THIS POST that you would like to be entered. That's it!
For extra entries, you MUST make ADDITIONAL comments! (So I can keep count of them).
For extra entries, you may do any or all of the following:
*Be a follower of this blog. You can be a long-time follower, or a brand new one.
*Help spread the word. You may have one entry for each DIFFERENT post telling others about the giveaway. You may post about the giveaway on your own blog, do a Facebook post, tweet, or whatever. Just spread the word.
* Just for fun.... tell us about your favorite specialty ruler.
This is just the first giveaway of the year. I'll be running one or two per month, so keep checking back!
Happy new year, everyone! I hope 2015 is the best year ever for you and those you love.
Tuesday, December 30, 2014
My New Bottle Tree


Monday, December 29, 2014
Festive Treats

I have this great little gingerbread tray that I made at a do-it-yourself ceramic studio a few years ago. I love to make gingerbread men. I've been doing it since my sons were little. This year, I made my gingerbread from scratch, using the recipe in the Betty Crocker cookbook. Sometimes I just use a boxed mix. It's all good. The faces and buttons are just a little confectioners' sugar and a few drops of water. I used a toothpick and dotted the icing on.
But the really fun things were the little marshmallow mugs! I got the idea on Pinterest. (Gotta love Pinterest!)


I make the gingerbread men every year. We love them. But the hot chocolate cups were new this year and were a big hit. SO EASY, too! Oh--- and the rest of the candy canes got smashed to use for chocolate peppermint bark. I forgot to take a picture, but all you do is melt chocolate and sprinkle the chopped up peppermint on top. When it's set, just break it into pieces. Easy peasy!
Friday, October 17, 2014
Sashiko Mug Rug

I finished a little sashiko project that I started a long time ago. It was just a little practice piece that I bordered and lightly quilted with a puffy batting.

The solid fabric in the center that holds the needlework is called Essex. It's 50% linen and 50% cotton. The weave is a bit looser than flat cotton, so it's nice to work with. The large sashiko needle and thick thread glide between the threads. The border is Japanese Indigo fabric.

I love my little mug rug. Perfect for a drink and a little snack.
I carry Sashiko supplies and Essex fabric on my website, along with some patterns and books. HERE
Bounty of the Season
I'm putting the garden to bed.... harvesting the last of the bounty. Now I have to clean, chop, freeze and can these lovelies. Thanks to my friend, Julie, for all the green tomatoes! I'll be making my Nana's green tomato hamburger relish today. Mmmmmmm

A few weeks ago, I was the recipient of a whole trash bag of fresh corn. That doesn't sound right. It was a clean trash bag, and a good way to drag around 50 ears of corn. This is going to keep me in corn chowder all year! I sliced and dried all those pears (and a few more bags of them) and I also dried a few bags of Italian prune plums.

I'm going to miss the garden and the farmers' markets with all the wonderful fresh produce.
A few weeks ago, I was the recipient of a whole trash bag of fresh corn. That doesn't sound right. It was a clean trash bag, and a good way to drag around 50 ears of corn. This is going to keep me in corn chowder all year! I sliced and dried all those pears (and a few more bags of them) and I also dried a few bags of Italian prune plums.
I'm going to miss the garden and the farmers' markets with all the wonderful fresh produce.
Tuesday, June 17, 2014
Tips on Machine Tension
| I use a variety of threads and there are many great brands out there. But more often than not, I find myself selecting products from Superior Threads. (I do a lot of my piecing with Masterpiece thread and all of my hand applique with Superior Kimono Silk thread- it's amazing!) They have great education articles on their website. The following us used by permission from Superior threads. When I'm having machine problems, the answer is ALMOST ALWAYS to change the needle or use the appropriate needle, or something to do with the thread. A NEW needle and GOOD thread are often the answer. If you inherit 75 year-old thread from your grandmother, use it for decoration in a pretty container. Don't use it to make a quilt! Anyway- I found the following interesting and I thought you might, too.  HOME MACHINES Q. Can I rely on the automatic tension system to adequately adjust the top tension? A. No. If you use different threads, fiber types, and sizes, your automatic tension setting most likely will not be adequate to adjust properly for all situations. Learning to manually adjust an auto-tensioned machine is very important when using a variety of threads. Q. How do I know when the top tension is too loose? A. The top thread loops on the back. You may also get what is called a birds nest, where the top thread bunches up underneath. Q. How do I know when the top tension is too tight? A. Thread breakage, thread shredding or fraying, seeing a lot of lint from a high quality thread, and/or feeling excessive resistance when pulling the thread through the needle. Make sure you also check the needle size because these symptoms may be related to using a too small a needle. Q. Do some threads require looser tension settings even though they are not heavy threads? A. Yes, especially metallic threads, hologram threads, and other sensitive threads. Q. Is it necessary to adjust the bobbin tension? A. Sometimes, but not nearly as often as the top tension. If a good bobbin thread is breaking, check the bobbin tension. It might be too tight. Q. It seems like the top tension doesn’t change even though I adjust the setting. Why? A. There might be lint or debris caught between or behind the tension discs prohibiting them from opening and closing properly. Q. Can you help me reduce the tension and stress in my life? A. Yes. Have a grandchild. View Bob's Tension demonstration. Video 1 (3 minutes) Why adjusting tension is important Video 2 (6 minutes) How tension worksView an interesting illustration showing how tension works, The Thread Tug-of-War
-----------------------------------------------------------------------------------------------------------
LONGARM MACHINES
Tension
is move involved on longarm machines. Until recently, there has been
no way to measure top tension on longarm machines so it required
constant experimenting and guessing. Bobbin tension also requires
frequent adjusting, usually every time a the thread combination changes.
There are two tools available for longarm tension measuring.
1. Top Tension Pro, an electronic device that measure top tension. Designed mainly for Handi Quilter and Baby Lock longarm machines.
Click here for details
Instructions and Tension Guide showing recommended tension settings
2. Towa Bobbin Tension Gauge View product |
|
Tuesday, June 3, 2014
Giveaway Winner- Congrats, Sandra!

OOps.... June 1st came and went and I forgot to pick a winner. The trusty random integer generator tells me that Sandra from Utah is the winner of the Pansy Faced Pooch pattern. Yea Sandra! I'll send you an email to get your address so I can get your pattern on its way. Sandra blogs at Sandra's Craft Corner. Check it out. I just took a peek.... oooo.... her Spiral Lone Star is gorgeous!
I'll post another giveaway soon!
Sunday, June 1, 2014
Apple and Pear Cozy's

Are these cute, or what?!? My friend, Tamara, surprised me with a little gift of an apple cozy and a pear cozy. I can just hear you out there.... "What does a person need with fruit cozy's?" It's not a matter of "need", my friends. They're CUTE! Seriously, they make people smile. And what a conversation starter when you pull one of these babies out of your lunch bag at work!

Tamara used worsted weight kitchen cotton- the stuff you use to make pot holders. She got the free patterns on Ravelry. By the way- if you like to knit or crochet and you haven't heard of Ravelry- you HAVE to check it out! My user name on Ravelry is suehauser. (Original, I know).
Friday, May 23, 2014

Tuesday, May 13, 2014
Patriotic Table Runner


 Last month, I was at a "getaway" with a few friends who are also in the guild. We all spent 4 days quilting. What fun! One evening, I was staring at this trying to decide how to quilt it and my friend, Julie, had lots of "suggestions". I looked at her and smiled, and she said, "Would you like me to quilt it for you?" I smiled back and said, "Would you like me to finish hand appliqueing that block your working on?" So we traded our projects and finished them for each other.
Monday, May 12, 2014
Two new pairs of socks
Longtime followers of this blog know I'm ever so slightly addicted to knitting socks. :-) I haven't blogged in a long time and have missed posting a lot of my finished knitting and quilting projects, but I thought I'd get back into it by sharing my latest 2 pairs.

These lovely soft yellow socks are made with Barking Dog Yarns in their Achilles Base. The color is called "Butter". It's exclusive to club members until April of 2015 and will be available to non-club members after that. She has bunches of beautiful colors available in various base yarns- hand dyed to order with great customer service!
The Achilles base (that's just the name this particular yarn dyer gives to it) is 80% merino wool and 20% nylon. I like this blend for socks because the little bit of nylon makes a huge difference in durability. There's nothing worse than spending all that time knitting a pair of socks and wearing a a hole in the heel in a relatively short time. My socks wear a lot better when there is something in the yarn blend that gives it a bit more strength.

The patten is called Spring Haze by Cynthia Levy. Her pattern shop is is called RedTigerDesigns.
This pattern is also exclusive to the club Barking Dog Yarns Sock Club Members for the year, but it will be available to the public around April of 2015.
I love Cynthia's designs. I've made socks from several of her patterns over the past few years. She lives in Yellowknife, Northwest Territories in Canada. Maybe she's so good at this because she has LOTS of use for nice, warm socks! :-)

When I first saw this pattern, I thought they wouldn't have as much warmth because of the "holes" in the lace. But when I wear them, they seem plenty toasty.
 It's not very noticeable, but the Spring Haze socks are mirror imaged. The cables twist to the left on one sock and to the right on the other sock. I love little special touches like that!
 Here's another pair by Cynthia. This one is free for a few more weeks while a knit-along is running and then there will be a nominal charge. I LOVE these! They're not nearly as difficult as they look (always love it when a pattern makes me look good).

This yarn is from Knitters Brewing Company. It's called Sockaholic and the color is Cosmopolitan. It's also a merino wool and nylon blend.

Such a fun knit! No chance of getting bored with these puppies!
These lovely soft yellow socks are made with Barking Dog Yarns in their Achilles Base. The color is called "Butter". It's exclusive to club members until April of 2015 and will be available to non-club members after that. She has bunches of beautiful colors available in various base yarns- hand dyed to order with great customer service!
The Achilles base (that's just the name this particular yarn dyer gives to it) is 80% merino wool and 20% nylon. I like this blend for socks because the little bit of nylon makes a huge difference in durability. There's nothing worse than spending all that time knitting a pair of socks and wearing a a hole in the heel in a relatively short time. My socks wear a lot better when there is something in the yarn blend that gives it a bit more strength.
The patten is called Spring Haze by Cynthia Levy. Her pattern shop is is called RedTigerDesigns.
This pattern is also exclusive to the club Barking Dog Yarns Sock Club Members for the year, but it will be available to the public around April of 2015.
I love Cynthia's designs. I've made socks from several of her patterns over the past few years. She lives in Yellowknife, Northwest Territories in Canada. Maybe she's so good at this because she has LOTS of use for nice, warm socks! :-)
When I first saw this pattern, I thought they wouldn't have as much warmth because of the "holes" in the lace. But when I wear them, they seem plenty toasty.
It's not very noticeable, but the Spring Haze socks are mirror imaged. The cables twist to the left on one sock and to the right on the other sock. I love little special touches like that!This yarn is from Knitters Brewing Company. It's called Sockaholic and the color is Cosmopolitan. It's also a merino wool and nylon blend.
Such a fun knit! No chance of getting bored with these puppies!
Friday, May 9, 2014
New Giveaway- Pansy Faced Pooch Pattern

Pansy Faced Pooch is one of the Flower Dog pattern series designed by Helene Knott. Helene also designed the popular Garden Patch Cat Series of patterns. (You'll be seeing a lot more of the cats on this blog in coming months!). It's an easy applique pattern. You can do hand or machine applique. Helene has included instructions for several methods in the pattern.
It's super easy to enter. For a chance to win, just comment to THIS POST. That's it! Easy peasy.
Want a second chance? Do a SECOND COMMENT to THIS POST and tell me that you are a follower of this blog. You can be a long-time follower or brand new. Just remind me that you are a follower.
Two chances not enough? For a third chance, spread the word. It doesn't matter how- tweet, do a facebook post, take out a full page add in a magazine :-) You get ONE extra chance for spreading the word. No multiple chances for tweeting and doing a facebook post. Spread the word as much as you like and do a THIRD COMMENT to THIS POST and tell me you shared the news and you'll get ONE extra chance. FYI, we do have an Alderwood Quilts facebook page and we LOVE Pinterest!
And for a FOURTH chance (YEA!) tell me what you'd like to see more of on this blog. I haven't been active for a while and want to get started again. I'd love to hear what you want to see. New products? Tutorials? What kind? Techniques? Quilt-alongs? I have lots of ideas but I'd like to hear yours first.
I'll do a random drawing on June first to select the winner. Be sure to do a comment for each chance. That's how I count to see how many numbers to put in the random number generator.
Good luck!
Friday, April 18, 2014
Springtime Quilt
Last week, this quilt was posted on the "24 Blocks" page on Facebook. SHEESH! I instantly got a bazillion requests for the pattern. I've carried it for years, but didn't have quantities on hand to take care of everyone. Since last week, I've ordered twice from BeColourful. The patterns come from the Netherlands, which is why they are a little hard to find. I now have a large supply on hand.
I think the colors are particularly stunning on this quilt. Simple- and just awesome! HERE's a link to the pattern on my website.

Here's a closeup. I always like photos that show the quilting.

If you enjoy paper piecing, this is a great new project for you!
I think the colors are particularly stunning on this quilt. Simple- and just awesome! HERE's a link to the pattern on my website.
Here's a closeup. I always like photos that show the quilting.
If you enjoy paper piecing, this is a great new project for you!
Subscribe to:
Posts (Atom)