Sunday, December 12, 2010

LAST ROW!!!

I'm sorry I haven't blogged much lately.  This KING SIZE Double Wedding Ring quilt is taking longer than I anticipated.  I'm not good at estimating how long a project will take.  People who know me, know that I'm really, really, really not good at it.  Good thing I'm not a contractor,.  I'd do a bid to build a house in a week and another bid to replace a light bulb in 6 months.  I thought I could get it done in a month, and it's taking me 2 months.  A friend of mine did one of these in 6 weeks.  I bow to her... the queen of quilts.  More about her later- she's going to quilt this monstrosity for me.


I'm ALMOST done with the top.  I thought you might like to see the progress.  My grand-dog, Cooper was visiting and helped me take the pictures.

The quilt will consist of 9 rows of 9 rings and measure about 105 inches square.

"Cooper... get off the quilt!"


At the time that these photos were taken, I was starting the 8th row.  Now, I am close to finishing the 9th row.

"Cooper... I SAID, get off the quilt!"


"I don't care how cute you are when you wag that little tail of yours..... get OFF the quilt!"


"That's it... stand right next to the quilt and get your head in the picture."
Obviously, it's not pressed and I just have it laying on the floor.  I'll do better pics when the top is done, and lots more when it's quilted.

I promised you a detailed tutorial for this and it's coming!  But the wedding is in 2 weeks, and I have out of town company coming and I still don't have the tree up.  So I'm going to have to put the tutorial off until January.  I'll be starting another one for my other son and his wife after the holidays, too.  I can take a little more time with that one (they got married 2 years ago and I'm already late).

I hope to get this to my long arm quilter tomorrow.  I'll see if she minds letting me take some pictures of that process.  I'm so excited!!!  I love this quilt ALMOST as much as I love the happy couple. :-)


Saturday, December 4, 2010

What's for dinner?

Swedish Meatballs!

I don't remember if I ever told you about the Simply Recipes blog before.  It's my all time favorite food blog.  You can get lost in the blog- saving and printing recipes.  If you like to cook, I highly recommend that you take a peek and wander around this great blog.

The latest entry is Swedish Meatballs (photo from the Simply Recipes blog).  I remember this dish as being pretty popular in the 60's and 70's when I was growing up in Philadelphia.  My mom used to make them, although I'm not sure her recipe was as sophisticated as the one on Simply Recipes.  I can close my eyes and "see" a big plate of wide egg noodles with these meatballs and lots of gravy over them... along with a green vegetable like beans, peas, or maybe cabbage.  I'm thinking peas right now....

This recipe calls for a mixture of beef and pork for the meat.  We use a lot of buffalo in place of regular beef.  It's a lot lower in fat, cholesterol and calories.  Plus- it's local since I live near a buffalo ranch.  But the lower fat content makes it behave a little differently in recipes like these.  I think I might try mixing buffalo with pork and see if the results are good. I'll let you know how it turns out!

A big thanks to Elise Bauer and all of her wonderful contributors on Simply Recipes for giving us such an amazing blog!

Monday, November 29, 2010

Rotary Cutter Replacement Blades


Here's a weird one for you!  My friend Nancy told me about this.  It seems that Harbor Freight Tools sells a product for cutting carpet that takes blades that fit 45 mm rotary cutters.  The blades are 2 for $1.99 (at least that's the price today). 


I have no idea if the price will change or if they will always be available-- and I'm not sure if they are equivalent to the blades we get from quilt supply businesses.  But they sure do look like they will work!  If anyone has used them, or purchased from Harbor Freight, let me know.  If they cut carpet, you wouldn't think they'd have trouble with cotton fabric. :-)

A couple of cute ideas from blogs I enjoy.....


This is cute--- but it's cuter when you know that this is a family portrait.  Heather at Small Fry and Co made this to reflect her family.... she has a photo of mom and dad and toddler and baby and this is the snow people version of that photo.  I was thinking it would be super cute to make these people out of flannel and arrange them each year as the real family grows.  If I had any extra time, I might try this!  :-)


And Lynn at Nebraska Views made some really cute Christmas stockings--- and she has a super great tutorial on how she does it.  Check it out!


Neither of these photos are mine- they are the work of Heather and Lynn.... check out their blogs for lots of inspiration!

I have a busy day today- lots of orders to fill, errands to run, and more sewing on the Double Wedding Ring quilt!  I just thought I'd share the links to these creative bloggers.  Happy Monday to all!

Sunday, November 28, 2010

We had a Shower!


 I'm still working on the Double Wedding Ring!  While you wait to see my progress, I thought I'd show you a couple of fun pictures.  My baby boy, Steve, aka the grown man who towers over me, is getting married next month.  The maid of honor hosted a shower last weekend.  Her mom made this  "wedding cake" out of towels.  Isn't it adorable?


Sarah (on the left) is the maid of honor, and Emily (on the right) will be my daughter-in-law in a few short weeks.  Emily is holding a bouquet that her cousin made with the ribbons from the shower gifts.  Such happy smiles!

It was a lovely shower, with a house full of women who love Emily and wish her a lifetime of happiness.

Sunday, November 21, 2010

I posted this last Thanksgiving, but I think there are a lot of readers who may not have seen it.

STUFFING BALLS
Here’s my all time favorite Thanksgiving tip. We love stuffing and I generally make a big casserole dish of it. It’s not my personal preference to eat the stuffing that was cooked in the bird- a little too greasy for me- but that’s just me. Everybody likes the crispy crunchy top of the stuffing. So-- what I do these days is make “stuffing balls”. I use an ice cream scoop (any size- it’s your preference) to scoop out the stuffing onto a cookie sheet (I have a silpat sheet I line it with but you could use parchment or spray with Pam). I do this ahead of time, or assign it as a job to someone who “wants to help”. Close to serving time, I pop the tray in the oven to warm the stuffing and crisp them up. The balls look nice in the bowl and they’re always a hit- especially with new guests who haven’t seen them before. These freeze well, too. Great to make extra and have some in the freezer to bring out as a side dish when it’s not Thanksgiving. We like them with chicken or pork chops.

Friday, November 19, 2010

Fans of Alderwood Quilts

I'm back on Facebook!  I have a button on my sidebar- become a FAN!

Tuesday, November 16, 2010

Busy Day!

I didn't get ANY sewing done today!  I worked about 10 hrs in the shop.  We got a fabric shipment, new patterns, I cut lots of Garden Patch Cats kits and filled lots of orders.  Our newsletter went out yesterday announcing our shipping special for the holidays.
DH did this for our homepage with one of the pictures he took on our property last winter.  They're predicting a stormy winter here-- we'll probably be looking like this soon!

I hope to do lots of sewing tomorrow--- wish me luck!

Progress on the DWR

I can see light at the end of the tunnel!


I haven't been posting a lot lately because I've been SEWING!!!!  Sewing, sewing, sewing!  I had a goal to make this king size double wedding ring quilt in 4 weeks.  I'm on week number 5 and it's looking like it will take me about 6 weeks.  I'm doing 9 rings across and 9 rings down (that sounds less scary than 81 rings).  Each ring is 11 inches across.  I measure from any spot to the same spot on the next ring.  I can't bring myself to call these things "blocks".  I have all of my rings done and now I'm putting them together.  In a "normal" quilt--- putting them together is usually the easy part.  Not so with this thing!  What I wouldn't give for a straight line right now.

I've taken some pictures of the process and I promise to do a very detailed tutorial complete with tips and pitfalls.... but that takes time and I'm going to do it after I get my top done.  I'm on a deadline and... well.... you know how it goes.

Back to the sewing machine with me......

Wednesday, November 10, 2010

Quilting Calculator iPhone App


I've been a bad blogger this week.... spending lots of time working on the Double Wedding Ring.  I'll try to get some pics for you tomorrow.  I'll do more of a tutorial on it soon but I'm really working hard right now just to get it done.

In the meantime- I have a little gift for those of you who have "fancy phones".  I carry a lot of Robert Kaufman fabric.  They sent me a newsletter today with this iPhone app.  If you're lucky enough to be an iPhone owner, this is the app for you.  Have fun!

Thursday, November 4, 2010

New blogger and a giveaway

I read a lot of blogs... really... a LOT of them!  I'm sporadic about it.  I'll go a week or 2 without looking and then I'll make a cup of tea and browse through my blog reading list for a while.  It's like looking at a really good magazine-- only better.

I rarely post about other blogs.  Jeez... I hardly have time to maintain my own!  But this one caught my eye for several reasons. 


I know that I have readers of ALL AGES from all over the world.  But the quilting industry generally caters to quilters who are.... well.... we have a few gray hairs.  Thankfully, that is starting to change.  I'm always thrilled to see fresh, new fabrics and patterns that are aimed to please those who may not yet have found their first gray hair.  :-) I want sewing and quilting to thrive for generations to come, and I want my own business to cater to quilters of all ages, so I love to follow blogs like this one, so I can stay fresh.

Shellie is a new follower of my blog and I just started following hers.  She has designed this cute Swirly Girl skirt.   And guess what?  She's giving the pattern away, along with the fabric to make it!  Check out her blog to enter her first giveaway, but don't delay because it ends on Nov 6th.  Shellie is an amazing seamstress.  She quilts, but she also does a lot of garment sewing.  That's how I started (half a decade ago).


 I just have to show you this.  Can you believe it?  It's a Halloween Poodle Skirt!  I laugh every time I look at it!  Shellie- you're VERY creative!  If you watch the TV show, NCIS.... this looks like something the character, Abbey, would wear.  :-)
 
All photos are from Shellie's blog.... Shellie Sews.  None of it is my work nor are they my photos.

Slow Cooker Liners

Just a quick note...
A lot of people have been asking me about the Slow Cooker Liners.  There may be other manufacturers, but the ones I have are called "Slow Cooker Savers" by Regency Wraps, Inc of Dallas, Texas.  My friend got them for me from Kitchen Kaboodle in Portland and readers have told me that they are available at WallMart and Statler's.  I think they're pretty widely available- if you look around, you'll probably find them at many other stores.

Wednesday, November 3, 2010

Cleaning the Slow Cooker

A friend of mine, Diane, gave me a package of crock pot liners.  I love making crock pot meals but hate cleaning up the crock pot, and I always wondered if these things worked.  WOW!!!!  They work!  No melting or burning of the liners... and it lifted right out, leaving a perfectly clean crock pot.  I made my Tarragon Chicken recipe last night.  For the recipe... look HERE.

Easiest cleanup ever- Thanks, Diane!

Monday, November 1, 2010

Lucky Number 1342!!!


It's gonna be a very happy Monday for Teresa!  Teresa is the very, very lucky winner of the AccuQuilt GO! Giveaway! 

I plugged the number 1408 (the number of entries) into the random number generator and it gave me number 1342. (If you're interested, you can find this tool at www.random.org)


Comment number 1342 belongs to Teresa, from Homer Glen, Il.  She also has a blog and it's called, It's All Good, which is appropriately named because I'm sure that's how she'll be feeling when she reads this!  She has some cute projects on her blog- you should check it out!  I look forward to chatting with Teresa and getting to know her.  Woo Hoo!  Another new friend!  One time, when my son was a little boy, he said, "Mommy- do you know everybody?"  I said, "Not yet, Honey, but I'm working on it!"

The fine folks at AccuQuilt (and I really do mean that- they've been wonderful to work with) only asked me to do a tutorial to participate in their program.  I'm pretty sure I've done that, but I have no intention of stopping here.  I will be finishing the Double Wedding Ring quilt and showing you my experience with the GO! along the way.  I will also be doing the Winding Ways, and Dresden Plate quilts with the GO! and I'll blog about them.  The tutorials I do with the GO! projects will be of interest to you regardless of whether or not you own one of these wonderful machines, because once the shapes are cut, you still have to do some sewing! :-)  The GO! just makes the cutting go lightening fast so you can get to the sewing part sooner.  I'm sure Teresa will be doing some projects, too, and I'll be following along and will be sure to show her creations as well.  (No pressure, Teresa.... HA!)

Thank you to all who have entered.  I especially appreciate all of the new followers to this blog.  I realize that many of you signed up to follow in order to get another entry in the contest, but I hope you find this blog interesting and that you'll stop by once in a while. I do a giveaway just about every month- not as good as this one, but still fun!

CONGRATULATIONS, TERESA!!!!!!

Sunday, October 31, 2010

New Socks and New Friends

 I just finished a pair of socks for my DH.  His birthday is Friday and I plan to make them one of his birthday gifts.  He doesn't look at my blog very often, so I THINK it's safe to post a pic of them here.  The pattern is Mr Pitt's Socks by Kaitlyn Falk Wong.  The yarn is String Theory hand dyed Caper Sock- color Brina.  They're sooooooo soft!

Clockwise from lower left- Carol, Sue, Wendy, Conney Jo, and Cindy.

 I had a blast yesterday.  I took a break from working on the Double Wedding Ring quilt and spent some time visiting yarn shops with some friends of mine from Ravelry.  If you are a knitter (or if you like to crochet) and you don't know about Ravelry--- as soon as you finish reading this post, you HAVE to check out www.ravelry.com.  On Ravelry, you will find patterns, projects, and lots of chat groups with every interest imaginable... for knitters.  As most of my regular readers know, I'm a quilter- I own a quilt shop.  But I also love to knit.  I usually quilt when I can at home and during my work day, and I knit when I watch TV or when I'm a passenger in a car.  You can get a lot of knitting done that way!  Knitting is very portable and I often take it on vacation or any other time when I know I will have blocks of time like in doctors' waiting rooms, etc.

The above photo is a group of ladies who are on Ravelry- all from the Portland/ Vancouver general area.  We all  belong to a chat group on Ravelry of people who like patterns and yarn designed and dyed by Wendy Gaal, who is the owner of Knitters Brewing Company.  There are almost 1500 people in this particular chat group  As with most groups like this, there are probably 10% of the people (or less) who actively post.  Anyway- several of us feel like we know each other from chatting and posting on the KBC group.   Most of us have participated in "Knit Alongs" with other group members, too.  By the way- we were all wearing socks that we knitted using yarn and patterns from Knitters Brewing Company.

A few weeks ago, Wendy announced that she and her DH were coming to Portland for a vacation.  Well... the group was abuzz and several of us who live near Portland decided to get together and drag Wendy to a morning of yarn shopping.

HOW FUN it was to get to meet the people I have been chatting with for over a year online!  I knew I would like them all, and I wasn't disappointed.  I have new friends!  We plan to get together again to knit.

Wendy Gaal, owner (Brewmistress)  of Knitters Brewing Company.  KBC sells luxury sock yarn and creative original patterns using sock weight yarn. Check out her Knitters Brewing Company website.

This is just too good not to show you.  Conny Jo had recent surgery on her foot and this outing was the first big one for her since her surgery.  See that big foot propped up?  She knitted a cast cozy for her owie!  Look at the color-work on that baby!

What a wonderful day had!  (giggle)

Friday, October 29, 2010

Giveaway update

We're getting close!  The giveaway ends On October 31st at midnight PST (Oregon time).  But I plan to be asleep, so I'll select the winner on the morning of November 1st.  I will delete any names that come in after midnight, though.  It will be a happy Monday for some lucky reader!

I'm blown away by all of the entries and all of my new followers.  I hoe you will keep reading after the giveaway is over.  I know I missed some, but I tried to click on most of your blogs.  I've totally enjoyed peeking into your crafting lives!  I'm very sad, though, that a LOT of those who have entered are "no reply" bloggers.  Some of you have asked questions or made nice comments and I can't reply to you because I don't have contact information.  I really do understand if you want to keep your email private, but I know that most of you don't know I can't contact you.  Try clicking on your own name and see what happens!  I try to reply to most comments.  If you leave comments (other than the giveaway entry) and I never reply to you- that's a big clue that your profile has you set up as "no reply".

If the random number generator selects your name and I can't contact you, I'll announce it in a great big font on here and give you 24 hrs to contact me.  After that, if I don't hear from you, I'll select another name.  I'm just mentioning this again to remind you to check the blog on Nov 1st.... you never know!  Remember- I once one a cruise when I bought ONE raffle ticket!

Even after the giveaway is over, I'll be doing lots of posts with projects using the GO!  I have the fabric selected for a Dresden Plate, a Winding Ways and a Hexie quilt.  I'll be showing you the GO! and how I use it, but all of these posts are useful even if you are using traditional cutting methods. 

I wish I ha a hundred of these things to giveaway.... but I can hardly wait to announce the lucky winner!

Progress on the DWR, felting, a pattern link.


 I'm working, working, working!  Actually, I've been busy in the shop.  We've had a lot of orders this week.  But I've been working every day on the Double Wedding Ring.  I have the red arcs all done- with red squares on the ends of half of them.  Now I'm working on the black and whites.

One thing I've noticed is that the cutting mats will have a lifetime.  Unless I miss my guess, this one will be at the end of its lifetime by the time I've finished with this quilt.  They aren't very expensive, but I expected them to last a little longer than this.  If you have a GO!, what has your experience been with the lifespan of the mats?

It really is mind-boggling.  I've been actively working on this for about 2 weeks, and I almost have all of the pieces cut, and more than half of them stitched... for a king size Double Wedding Ring quilt!  That's incredible!  Without the GO!, this never would have been possible.  Next week all of these pieces will start to come together and I will finally be able to have the fun of placing the arcs and intertwining the colors.  I can hardly wait!


I got a lot of comments on the felted entrelac bags the other day.  Thank you  for all of your kind words. (blush, blush). I'm usually pretty good about citing patterns and giving links but it slipped my mind this time.  I'll go back and put it in that post, and also give it here.  The pattern I used is a Skill-Builder pattern by Knitability.com.


 I also have a few Booga Bags.  The Booga Bag pattern is free and it's a great first felting project!

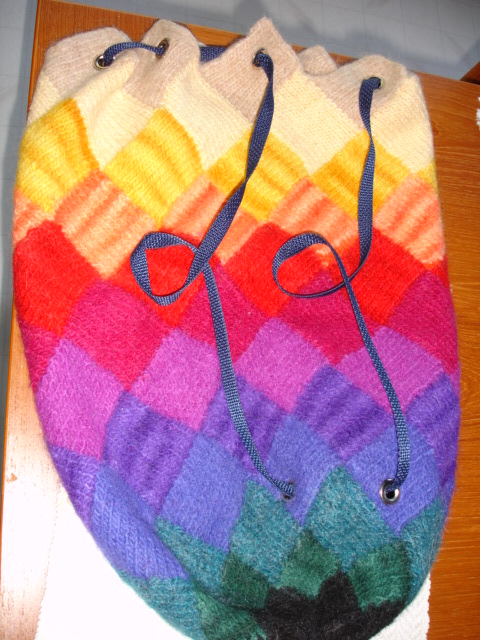
This one is pretty thick.  I used 2 strands of Cascade 220 wool yarn when knitting this one.  I used solid dark gray, light gray, and purple, alternating, for this.  To blend the colors, I started with
2 strands of dark gray for the bottom.
Then one strand of dark gray and one strand of light gray for 2 rows
Then 2 strands of light gray for several rows
Then one strand of light gray and one strand of purple for 2 rows
Then 2 strands of purple for 2 rows
Then 1 strand of purple and one strand of dark gray for 2 rows
then 2 strands of dark gray for several rows
.You get the idea.  Just keep using 2 of the same color, then one of the old and one of the new colors together for 2 rows.... then 2 of the new color.  It blends the colors nicely.

 
This is just a little one in single stranded self striping Noro Kuryon.  It's thinner and lighter.


I've loved this one for several years- it looks pretty good in this photo but it's far from new-looking these days.  How do you like the little "spooky eyes" fabric under the booga bags?  :-)


You can also take an old wool garment (sweaters are good), and felt them.  Then cut them up and use the felted wool to work with.  Resale shops are a great place to find old sweaters to felt.  Look for sweaters that have holes or are ripped.  They're cheap.


I lifted (with permission!) these photos from another blog.  AMKreations is very creative and has a nice blog.  She made this clutch by felting and old sweater and lining it with a pretty batik.  There's a little felted wallet in there, too.  I think I need one of these. :-)

I'd like to make a felted laptop cover one of these days.  You can get creative with the sweaters and use the ribbing at the waist for the flap of the bag, and use the ribbing at the cuff for pockets.  The possibilities are endless.  Have you made any felted items?  I'd love to see them!

Another thing I'd like to do someday is felt some old sweaters that belonged to my kids when they were little.  I saved some of them... not all in great shape... for this purpose.  It would be one of those "Mom things" to have a felted wallet or laptop case made from a sweater or blanket that my children used.  (My babies are grown men now).

I once made some felted place mats but I don't have a picture.  Just felt an old sweater, then cut place mats out of them.  It's that simple.  You can needle felt pretty designs on it if you like.

The last felting topic is needle felting.  That's a whole different ball game!  One of these days I'll do some needle felting and blog about it.  Gotta clear some other projects off the list first!

I have a wonderful day planned tomorrow with friends.... I'll take my camera.....

Veranda Tote


This is my new Veranda Tote bag.  I LOVE this bag!  A few weeks ago I told you that I took a few classes at a buyers market held by a quilting supply distributor.  I showed you the "Diamonds are a Quilter's Best Friend" table runner that I made.  I also took a class with Penny Surges to make this adorable tote bag.  Penny (on the right) was kind enough to pose for a photo with me holding my finished bag.


I love meeting and taking classes from pattern designers.  Penny is not only a sweet lady, but she is a very good teacher.  She makes her students feel good about their work and she helps to make them successful.  Penny is also the designer of the popular Bow Tucks Tote and the smaller version- the Mini Bow Tucks.


The front has 2 pockets with a cute little tailored ruffle.


And a closer-up----


This shot shows the back pocket and the stitching detail on the handle.


And the inside pockets.  LOVE all these pockets!  I put a plastic insert into the bottom (that's why it's shiny).


Here are a few of Penny's sample bags.  There are 2 pockets in the front.


The sides can be single pieces of fabric, or they can be pieced, as is the one in the middle (above photo).
Hmm.... looks like we were blocking the fire exit.  Good thing there wasn't a fire.


The photo above also has pieced sides.  Aren't those handles cute?  The handles are very sturdy.  They are lined and stitched all the way down the length in 4 places.


In both of these samples (above and below) you can see the 2 front pockets and cute coordinating button closure.  The back of the bag has one large pocket and the inside lining has large pockets all around.

The whole bag is stabilized with fusible fleece.  I love working with this stuff- it's easy to apply and gives the bag nice structure.  It's soft but not floppy.

I have the Veranda Tote pattern on my website, as well as fusible fleece by the yard.  And best of all... it's a fat quarter friendly project.  A nice coordinating pack of fat quarters is a good start for this bag.

Wednesday, October 27, 2010

Knitted Entrelac Backpack and Tote


I recall that about a year ago, I told you I'd talk about felting.  The top photo is the finished project- small and large felted entrelac bags.  The lower photo is the bags before felting.  The pattern is a Skill Builder pattern by Knitability.com.

There are lots of topics under the general heading of "felting".  I'll talk about all of them at some point, but right now I'd like to show you how to felt a knitted project.  In a nutshell, you knit something in mega size in 100% wool, then agitate it in hot water, dry it, and you have a felted product.  When it "felts", it shrinks up and the fibers become intertwined.  You get a solid piece of fabric- like a wool blanket.  It's great for handbags.  You can actually poke holes in it or cut it with scissors and it won't unravel.  It's really strong.

I love entrelac knitting.  I got hooked on it a few years ago.  My niece, Meredith, got me into this project.  She bought a skein of all of these colors in Lamb's Pride wool yarn.  She loaned me all of the yarns- you only needed a little of each one.  She made a bag, then loaned me the yarns and I made 2 bags, then I gave them back to her for more projects.  THANKS, MERE!  These are photos of the knitted bags before felting.  Look closely- there are 2 bags... my hand is on the top left for scale in the above photo.

This is a closeup of the bags before felting.


Most of us have accidentally felted something at some time in our lives.  That's when you take a favorite sweater and turn it into a Barbie doll outfit when you think you're using cold water in the washer but it's actually on hot/hot.  100% Wool (and some other natural fibers) shrink when agitated in warm water.  You can felt a project in a washing machine, or by hand.  When you felt by hand, you can just agitate it with your hands (or a wooden spoon or spatula).  You can also boil it, but not unless it's a solid color.  Otherwise- it will all kinda turn to a muddy color.  I know.

You can also do some felting with a steam iron.  The steam will felt wool, but without agitation, it will take more time at the iron that I want to spend.  It would be a good option for very minor felting or for delicate wool.

Be forewarned- if you felt in a washing machine, you should put the item in some sort of bag- I like using pillow cases.  If you don't do this- you will become best friends with your plumber.  The bag contains the blobs of wool and keeps them out of your plumbing.  It also protects the item you're felting from attracting other fibers which can become embedded (felted) into your project.  I know this, too.  When you agitate the item, you do this by throwing something tough in with it- like old jeans.  The first time I felted something, I threw in some old towels and didn't put it in a pillow case.  My DARK knitted bag ended up with white fibers (from the towels) permanently embedded into it.

You CAN felt in a front loader washing machine, but the results can be unpredictable.  I prefer using a top loader.  I have a front loader.  I sometimes go to a laundromat, and sometimes I beg someone with a top loader to let me play in their laundry room.

My felting bag is an old pillow case that I put a zipper into.  Works great. I put a very small amount of detergent into the washer and filled it with very hot water- then put it on the super duper cycle (or whatever your washer calls it).  Basically- treat it rough.  I keep pulling it out, opening the zipper and looking at it until it's the size I want.  Every time I pull it out, I use my fingers to shape and flatten areas that might be "rolling" or looking mis-shaped.


This is after felting.  Now they need to dry.  You're supposed to air dry them.  Sometimes (shhh.. don't tell the felt police) I put them, in the pillow case, in the dryer to get the drying started.  I don't leave the item in the dryer until it's finished drying- I just leave it in there long enough to get it past the really wet stage.  Put them over a form or stuff them if possible.  I made a large bag and 2 smaller ones.  The small ones are stuffed with small towels and the larger one is laying on the right.   It's too big to stand up and I couldn't find anything to invert it over.

Here are the little ones. 

And this is the big one all finished after drying for several days.


I used a heavy webbing for the straps.


The small bags have holes knitted into it for the straps.  I kept opening them up as it was felting.  For the large bag, I inserted grommets.  It will hold more weight.


The grommets are all around the top and there are 2 closer to the bottom.

.


Here's the finished small neutral bag.  I used Noro Kuryon yarn for it.  It's self-striping yarn so the colors just changed like that using one skein.