Sunday, October 17, 2010

Change Can be a Very Good Thing!


Change can be a lot of things.  Right now--- I'm doin' the Happy Dance because I'm making some changes to my website that are VERY EXCITING!


My wonderful web designer (we'll just call him Amazing John) is doing some upgrades for us.  DH and I met with him a few weeks ago and talked about some enhancements we'd like to see on the website.  The changes will be put in place over the next few weeks, but the first one happened today.  (Me, doing a little twirl).

Previously, The Alderwood Quilts website has been set up such that we only offered full yards of fabric.  You could always contact me and ask for partial yard cuts, but most people didn't do that.  Now, when you view a particular fabric, you can select the quantity you want in increments of 1/4 yards.  Not only that, but he has also put the option in there for people to select Fat Quarters.  AND... the Fat Quarters are priced the same as a regular 1/4 yard cut- no additional cutting/folding fee for FQ's.  Woo Hoo!!!

It looks like this.....

This is something that customers have been requesting and I'm pleased to be able to offer it now!

More changes to come, and I'm still cutting Double Wedding Ring pieces.  I took a little trip to the beach over the weekend and slacked off on my projects.  And today, we are having beautiful weather, so I just can't resist spending some time in the lavender field.  They're threatening frost this week so I want to clean the plants up a bit and put them to bed for the winter.  I'll be sewing bunches this week....

Thanks to all who have entered the giveaway.  I have read all of your comments and I am thrilled to have so many new readers and followers.  WELCOME!

Thursday, October 14, 2010

Straight of Grain and EQ


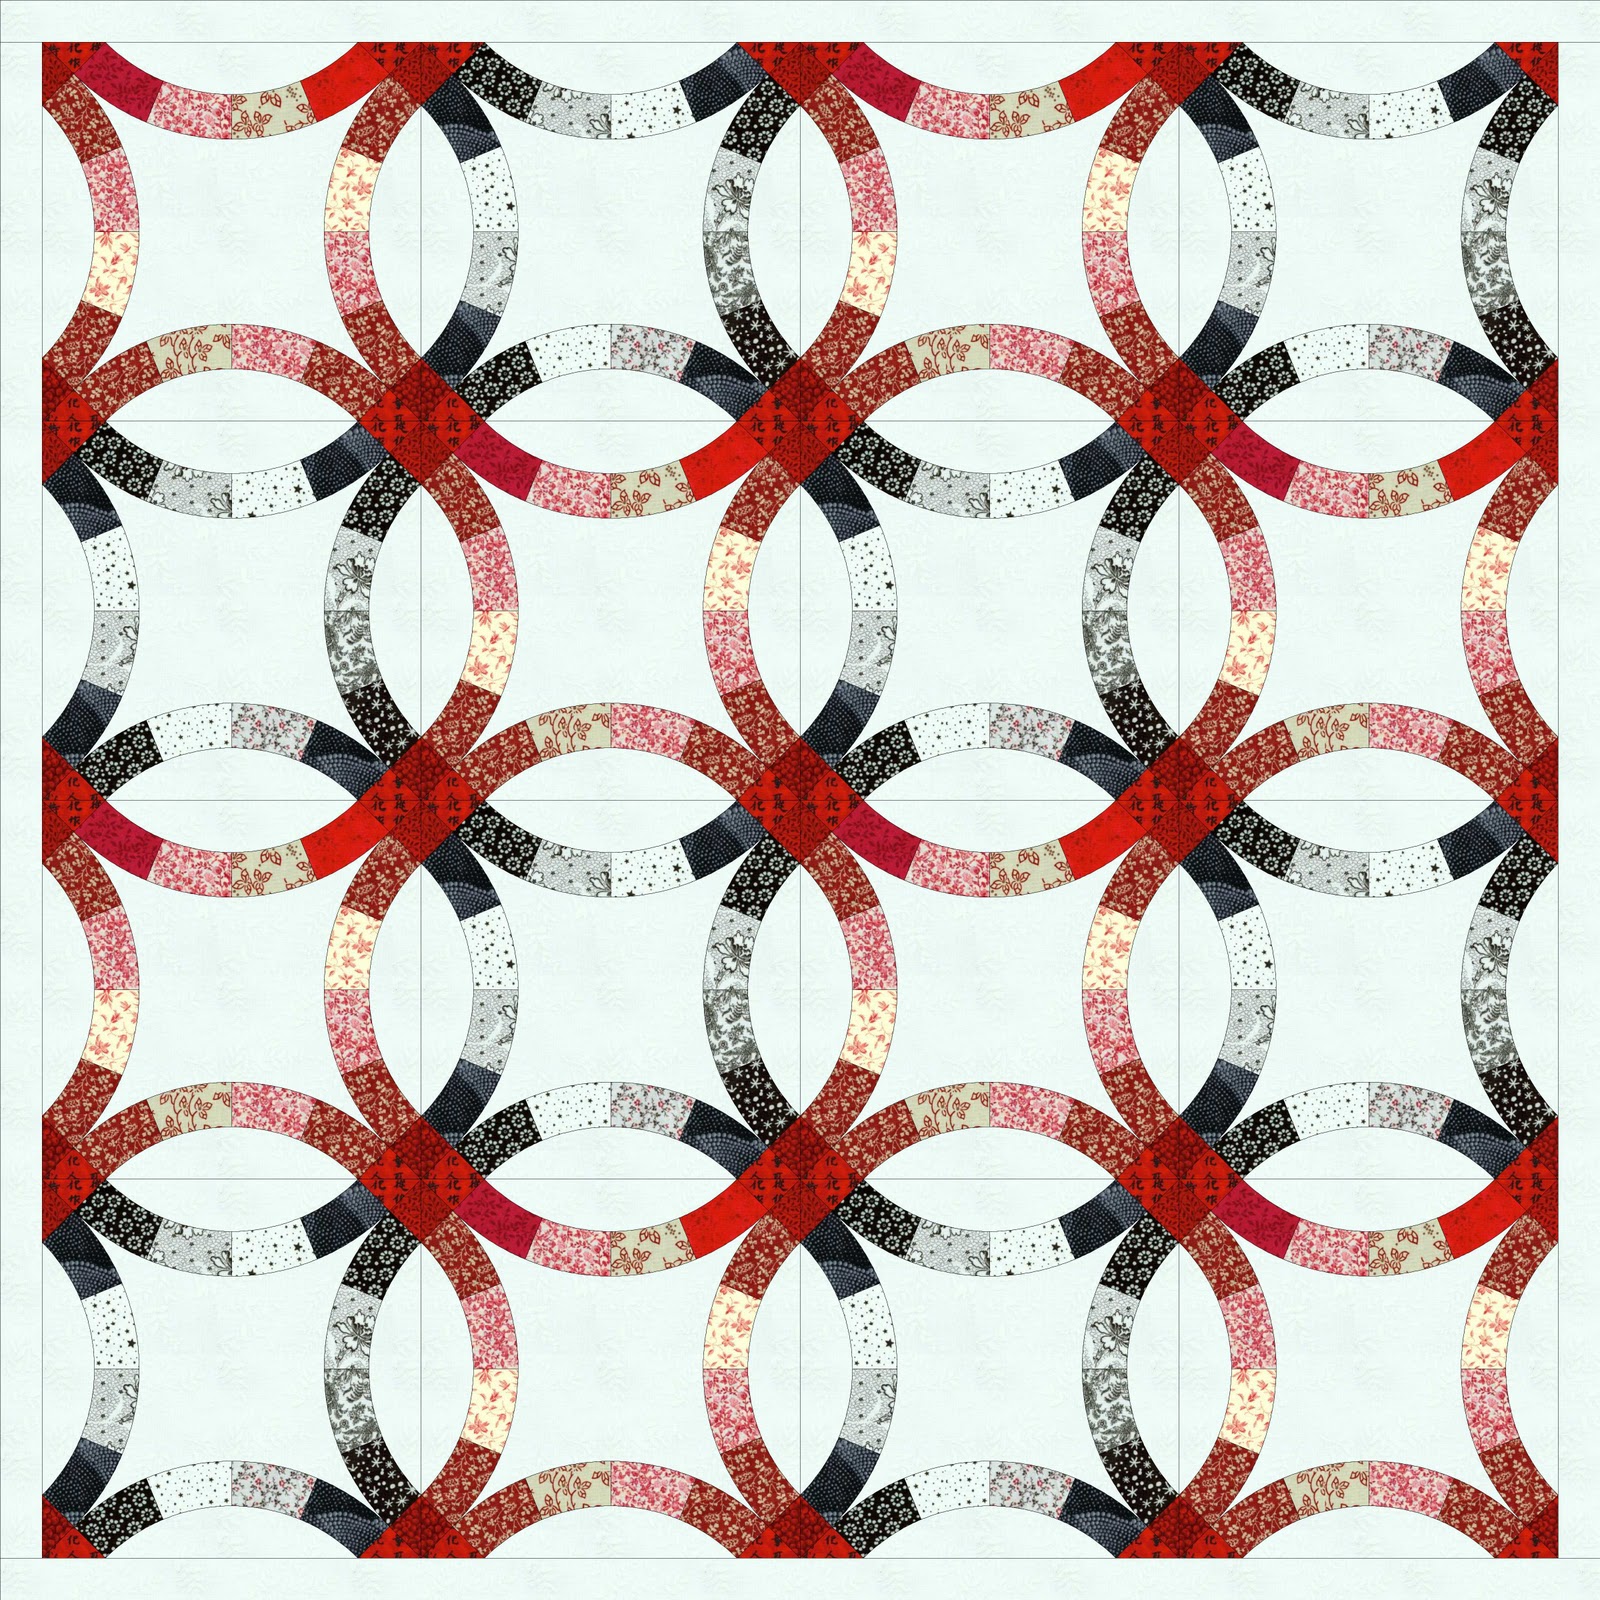
I have a clear vision in my mind of how I want this Double Wedding Ring quilt to look, but I don't want to waste fabric or time by being surprised.  So I plugged some fabrics into an EQ project just to see if I'm on the the right track.  This is just a quick sketch-- I didn't bother with the borders or with many fabrics.  I just wanted to make sure that I want the lighter fabrics in the center of the arcs and the darker ones at the intersections.  I LIKE!  The arc of the EQ block has a different number of pieces than the AccuQuilt arc.  No problem- I just wanted to visualize my design.


For those of you who are not familiar with EQ- it stands for Electric Quilt and products made by the Electric Quilt Company.  It's an amazing quilt design software product that is more fun that jumping in a pile of leaves!  The version I used today is EQ6.  I bought the EQ7 upgrade but I haven't gotten around to loading it yet. 

Several people sent me messages about the grain of fabric (see post of Oct 12).  I thought I'd talk a little more about it today.  It's VERY important that you are aware of how the piece of fabric you are working with related to the bolt before it was cut off.  If you no longer have the selvage and can't tell, the easiest way is to tug in both STRAIGHT directions (NOT the bias).  One straight way will have some give and one will be stable.  The stable direction is the lengthwise grain--- it's the grain that runs the entire length of the bolt.  For fun- there's another way.  Take a piece of fabric (it can be a fat quarter or larger).  Align it so it's straight- with the threads.  With your hands pretty far apart, "snap" the fabric.  Then hold it the other way and "snap" it.  You'll hear a different pitch for each of the tugs.  This takes a little practice, but the pitch is lower if you snap it width-wise and higher if you snap it lengthwise.  It's like a musical instrument- the width-wise threads have less tension on them than the length-wise threads.  The "snap" is also a bit more sharp in the length-wise direction and fabrics with different thread counts have different pitches, too.  Cool, huh?  Does this qualify as a "parlor trick"?  If you know what that is, you're showing your age.  I obviously know what that is.  :-)

                                                                      *** SNAP!!! ***

The reason we are talking about this along with the AccuQuilt GO! is that they say you get more accurate cuts if you place the pieces of fabric on top of the shape to be cut as if it was running off the bolt and being fed through the machine.  The lengthwise threads will not stretch as they are rolled through.  I am assuming that this is more of an issue of the pieces are larger, as they will be when I cut the large center shapes.

When binding a quilt, I generally like to make my own bias strips. If I'm short on fabric (or being lazy) I sometimes use straight binding.  I don't recommend this for flannel because folding it along a thread weakens it.  It weakens all fabric, but it shows more in flannel.  You get that white strip along the fold where the puffy threads separate.  If you do use straight binding, you will have a little bit of "give" if you cut the strips width-wise and more stability if you cut them length wise.  Your decision.  But knowing the characteristics of the fabric help you to make the choice.  If you're binding anything that goes around a curve- use bias strips for sure.  By the way- the reason we just don't fold the back over the front to bind the quilt is that it won't be bias, and if you ever need to replace it from wear, you won't be messing with the body of the quilt.

When you're concerned about "draping" you need to know the orientation of your fabric.  This generally isn't a problem with a quilt because you have the batting and backing and it's all quilted together.  But there may be times when it makes a difference if there is very little quilting on your piece.  Try to use lengthwise grain strips to make your outer borders- especially if you plan to hang the quilt.  It will help to keep it from rippling.  There are other tips to avoid that, too-- I'll have to add that to my future posting ideas, as well.  Bias is a big deal when making clothing.  We've all seen "saggy" sections on poorly made clothing.

The grain of fabric can "talk" to you and help you sometimes.  Want to make STRAIGHT crosswise strips?  You have to start with straight fabric.  Otherwise, you get strips that change direction at the fold and look all wonky.

First, iron the fabric.  Then match the selvages.  If the piece is large, hold your hands pretty far apart.  Now wiggle the top to the left and right with relation to the back.


With selvages even, wiggle back and forth until there is no buckling of the fabric and it hangs nice and straight.


When it hangs nicely, that's where you want it to be.  I know that the left and right edges (where they were cut off the bolt) are probably not straight.  If you line up the cuts instead of lining up the grain, you'll pay the price.  NOTE!!!  When the grain is straight, that doesn't necessarily mean the printed pattern will be straight!  If you just go with the print, you might end up with a mess.  Just one more reason to buy good fabric.

Just take a deep breath and make a new, straight cut on one edge.  Now you can work from there.  The messy piece you cut off is great for paper piecing.  Put it in your scrap basket.  You need to align fabric relative to selvages and grain.  Aligning anything with the cut edge assumes that the person who cut it was perfect.  'Nuff said.

I see a danger in using the GO! that it's easy to disregard the grain of the fabric.  Not good.  When we use rotary cutters we generally have some awareness of keeping things pretty straight on our cutting surface relative to the selvages.  But if you cut little pieces to put over the die shape (which is the best way I can think of to conserve fabric), you can end up with a quilt made without any regard for the grain.  In some cases, this is OK.  I'm just saying.  This is not the fault of the GO!  It's just something we need to be aware of.  The machine is only as good as the operator, after all.

Congrats!  You made it to the end of a very long post. :-)

Wednesday, October 13, 2010

Better Than Vanilla Socks


Holy Cow!  There's no way I can possibly find time to send a reply message to everyone who has posted an entry in the giveaway, but I have been scanning the comments and reading what you have posted.  I can't believe how many of you are out there reading.  I'm so glad you've found my blog and I hope you find something interesting or informative here from time to time.  I'm amazed at how many of you would really like to make a Double Wedding Ring quilt.  Maybe after I'm finished with mine, you'll start one, too.  I hope so!

A note to those of you who are new to blogging and those who are new followers--- WELCOME!  Blogging is super fun.  You learn lots and meet great people.  It takes a little while to lean the ropes.  Ask for help if you get confused or frustrated.  This is supposed to be fun- not frustrating.  To post comments, you need to have a profile.  You can put information about yourself in the profile, or you can leave it pretty sparse.  If you want replies, you need to have an email address in your profile- or at least put your email in the blog comment.  There have been so many new bloggers or new followers I wanted to send messages to but they have no email address and I can't contact them.  (envision my best pouty face... with lip out...).  This is just a suggestion- if you are concerned about putting your personal (or work) email in blog posts, why not consider getting another email address just for public stuff, ordering online, newsletters, etc.  You can get a free email address through yahoo, hotmail, gmail, and others.  Then use it for all the internet stuff.  You're personal email inbox will then stay uncluttered.


I've been working on cutting my double wedding ring pieces.  For the most part, this month, I plan to do every other post about my AccuQuilt project.  Today I thought I'd show you my latest pair of socks.  This pattern is called, "Better than Vanilla" by Judy Sumner.  Sock knitters sometimes refer to plain socks as "vanilla".  These are a very easy pattern repeat- hence the name.  Judy has a bazillion sock patterns out there!  Her website is Knoxsocks,  She also wrote Knitted Socks East and West.  A large number of her patterns are pretty basic but very cute.  I really like her work.  I'm not sure what this yarn is because it was given to me and no longer had a wrapper on it.  It's very soft, though.  I'm pleased with how they worked up.  As usual, I do most of my knitting in the car, or watching movies about twice a week with my DH.  I started these over the summer, worked on them while taking a trip to California last month and just finished them up.

Tomorrow--- more on the Double Wedding Ring!

Tuesday, October 12, 2010

Getting Started on my Double Wedding Ring

Let's start making a double wedding ring quilt.  When you open the die package, this is what you get.  This particular one is a 2-die set.  Most are one die- but the DWR has a lot of pieces. The die on the left is blade side up and the die on the right is blade side down.  the papers at the top are the packaging- includes pictures and how the pieces go together to make a little wall hanging.


When you look closely at the spongy side of the die, you see the cuts around the shapes.  In the photo above, I'm pulling back the foam with my fingernail to expose the blade.  SHARP! 


It's very hard to see where the blades are- at least on a new die.  The AccuQuilt folks encourage customers to use a permanent pen (like a Sharpie) to hi-light the blade areas.  I must say that I wish they came marked already, but it's really not hard to do.


The Double Wedding Ring die set has a lot of pieces and you need different numbers of different shapes to make the quilt.  I marked the shapes with the corresponding letter because I just know I'll get mixed up and I can use all the help I can get.  Notice, also, that the shapes even have little tabs that are used as registration marks to keep your piecing super-duper accurate.


Each die has instructions to make a project.  The DWR die package has a pattern for a small wall hanging.  It shows you how the pieces go together to make the DWR and you need to adjust it yourself to the size quilt you want.  I am making a king size quilt top.... so a little math tells me..... I need a bazillion little pieces.  :-)


I'm first cutting the little wedge pieces- D and E.  Each arc is made of 3 D's and 2 E's.... plus 2 of the little squares on the ends.  I'm working on the D's and E's.  My quilt will be black, red and white.  My background is white and the little pieces that make up the arcs will be prints with these 3 colors.  I'm alternating black and white arcs with red and white arcs.  Today I'm cutting red and white.  My plan is to make the center piece mostly white with a little red, the pieces beside it pretty much equal red and white, and the end squares mostly red.  I'll do the same progression with the black and whites- making them whiter in the middle and blacker on the ends.

I cut some long strips a little taller that the shape and then rough-cut some pieces to place over the shape that I have marked with the sharpie.  I layered 6 pieces of fabric over the shape.


With the die blade side (foam side) up, fabric on top of the shapes I want to cut, I covered the die with the cutting mat.  AccuQuilt has different sizes of mats that fit on different sizes of die.  Then through the rollers they go.... with a turn of the handle.... the die slides through.


Once in a while a thread doesn't cut, and needs to be snipped.  So far- this is rare.  I am just careful when I lift the scraps away from the cut shapes.  The foam seems to be thick enough, with the blades recessed deeply enough, that I have not felt it was dangerous to have my fingers around the blades.  So far, so good.

As I get more cut, I'll mess with the positions of the fabrics a bit more.  I won't have 2 of the same fabrics in an arc when I start sewing them.  But notice the dark reds on the sides- they are not symmetrical.  You need to cut half of them right side up and half of them upside down so you get an equal number of left and right ends of the arcs.  The 3 center pieces can all be cut right side up (or whatever).  It's amazing how fast the cutting is going!  This would have taken me forever to cut with templates.  But what's even better is the fact that they are such accurate cuts.

Speaking of accurate cuts.... there is a tip offered by AccuQuilt to cut more accurate shapes.  When referring to the "straight of grain" on fabric- there are 2 ways that are straight- from selvage to selvage, and the long way as wrapped on the bolt.  The grain line that runs from selvage to selvage is the crosswise grain (weft threads) and the grain line that runs the length of the bolt is the lengthwise grain (warp threads).  If you tug both ways, you will find a little bit of give in the crosswise grain but the lengthwise grain is very stable.  Of course, the bias (running diagonally) has a lot of give.  Whenever possible, it's best to place fabric on the die shapes so that the fabric will cut (run through the rollers) as if going through WITH the lengthwise grain.  Think of it as feeding the fabric through the rollers as if it were coming off the bolt that way.  I'm not sure it makes that much difference.  These things look pretty darned accurate to me.  But it's good to develop good habits from the start.

Well.... more cutting for me.... lots and lots and lots of cutting......

Thursday, October 7, 2010

Diamonds are a Quilter's Best Friend

Last week, one of the wholesale distributors of fabric and quilting supplies from which I purchase a lot of the products I sell on my website had a trade show/ buyers' market.  They do this twice a year and along with the show, they have a day prior to the show when they hold classes.  The classes are taught by pattern designers and the students are mostly shop owners making shop samples for display. 

I love taking these classes, mostly because I think its fun to meet the people who design the patterns.  One of the classes I took was to make a table runner called Diamonds are a Girl's Best Friend.  The designer is Theresa Richards Chickering aka Fabric Tart.  I was so excited that I FINISHED the table runner in the class.  The pattern is very easy to follow and the runner works up very quickly.  I think it took me about 2 1/2 hrs from start to finish.  Theresa is a delightful person and it was a very enjoyable few hours working in her class.

The pattern includes 2 alternate views.  I made the one with the large diamonds called "Big is Good, Too". 

As luck would have it, these fabrics in the kit they provided for us go very well in my kitchen and dining room.  Now to get it quilted.....

I'll be adding this to my website soon.  If you just can't wait- shoot me an email.

Wednesday, October 6, 2010

AccuQuilt Resources

I've been getting to know my new AccuQuilt GO! this week.  It's one of those things that's super simple and you can learn how to use it in 2 minutes.  But you can also look at the resources and read and browse through the free patterns and spend some time learning how to make the most of it.


The website if very informative and it seems like there's something new on there every time I log on.  My big discovery this week was the GO! Reference Charts.  On the AccuQuilt home page, on the left side, there is a box that reads, "Free Stuff".  Under that, one of the choices is "GO! Reference Charts".  In my opinion, these charts are what make this machine really useful. 

The first is the Cutting Equivalents chart.  One of the reasons I resisted looking into the GO! initially is that I though you were limited to the GO! pattern resources.  I thought that I couldn't use it to make commercial patterns not marketed through AccuQuilt (or that it would be difficult to do so).  WRONG!  With this chart, you look for the shape and size you want (for instance, a 3" x 1" rectangle) and it tells you the actual cutting size for that finished shape and the die that have that shape.  Very cool!

The second chart is exciting for people like me who forget what I have.  (Please tell me I'm not the only one!)  It's called the GO! Fabric Reference Chart.  This one tells you all of the shapes on all of the die.  For instance... it has a list of all the sizes of circles and what die they are on.  After you get several die, it can get confusing.  You have lots of different sizes of circles on different die.  Let's say you're doing an applique quilt and you need to cut a bazillion 2 inch circles.  Which die is it on?  You can spend 20 minutes searching through all of your die to see if you have something that will work, and looking through all of the die on the website to figure out what you want to buy, or you can just look at this chart and see what your options are for that size of circle.

I have a pattern that my friend, Julie, gave me.  She made an amazing quilt from an old magazine.  I fell in love with it and she shared the magazine with me.


I then realized that I needed to cut a gazillion leaves, not to mention all those skinny little strips for the vines.  Fun quilt.  Not so fun cutting all the leaves.

SO!  Looking at my handy dandy charts, I see that the GO! has shapes for the squares, the half square triangles, AND the leaves AND the vines!  Woo Hoo!!!!

Now get this--- I can cut the leaves and applique them on by hand or machine.  OR... I can iron on fusible web to the back of the fabric, cut it with the go, peel off the backing paper, and just iron those puppies on!  (Yes, yes- I'll stitch them down.... but the fusible gives me good placement).


 This is the Rose of Sharon die.  The pieces go together to make pretty flowers and leaves by Sharon Pederson.  But this is an example of you you can use one piece in the die to incorporate into a pattern that is not from the AccuQuilt website.


Here's one called, "Stems & Leaves".  I'll have to look at both of these die to see what leaves are the right size. 

Several people have asked me how you can cut just one shape and minimize waste.  No problem!  You don't have to cut all of the shapes on the die.  You can (and will often) cut just a few shapes.  When you see me working on my Double Wedding Ring, you'll see how I do that.

Yes- this means you would need to invest in several die.  But it's pretty obvious to me that after you get a few, they start to become more and more useful as you can mix and match the shapes.  Besides- you can tell everyone in your family that they never have to figure out what to give you for a gift again.  Make a wish list and tell them where to find it.  And they can even order off the AccuQuilt website.  Of course, they COULD contact me and order through Alderwood Quilts, (shameless plug for my website :-)

I've been organizing and ironing all of my fabrics and lining them up to start cutting the pieces for the Double Wedding Ring.  I'm amazed at how many of you would select the DWR as one of your 3 die choices should you win the giveaway.  I'm excited to get GO-ing on it!

Sunday, October 3, 2010

***ENDED***Alderwood Quilts October Giveaway- AccuQuilt GO! ***ENDED***

Well.... I've dropped some hints and you may have figured it out by now.... I have a GO! to give away!  The nice folks at AccuQuilt gave me one to try and review (pinch me!) and I get to give one away to a lucky reader!  I'll be making a Double Wedding Ring quilt this month and blogging about it as I work.  I'm attempting to make a king size traditional double wedding ring in ONE MONTH.  There's no way I could do that without the help of this amazing fabric die cutter.

The winner will be selected on November 1st by random drawing.  I'll be using a random number generator.  Previous winners of my blog giveaways are welcome to play, and so are international readers.  If you are a No-Reply blogger (and many who are no-reply don't realize it!!!) you MUST provide me with a way to contact you should you be selected as the winner.  If I can't figure out how to contact you, I will give you 24 hrs to read the post where I announce the winner and contact me.  After that, I will have to select a second name.

The winner will receive the GO! fabric cutting system and 3 die of your choice.  (Yes--- THREE die!)  You also get the cutting mat.  You don't have to make ANY additional purchase to start using the machine.

Here's how this works.  I will give you several ways to receive entries.  You need to do a separate reply to THIS POST for each entry.  What I will do is count down the number of entries, then put that number in the random number generator.  When I get the winning number, I will count down to that number.  If there are 500 entries, and the number generator turns up the number 17.... I count down to the 17th comment and that's the winner.  So-- if you put all of your entries in one comment, you will really only get one entry.  Make sense?

You can have a maximum of 4 entries.

For one entry- just ask.  Post a comment telling me you want to be entered.  (Easy, huh?)
For a second entry- be a follower.  It doesn't matter if you're a long time follower or a new follower. (still easy).  Post a SECOND comment to tell me that you are a follower.  Don't assume I know.
For a third entry- go to the AccuQuilt website and take a look at the die for the GO!  Post another comment and tell me which 3 die you would select if you win.  Remember to look at the GO! die- not the Studio die. The Studio is a different machine.  (this takes a few minutes but it's fun to dream!)
 For a fourth entry- if you have a blog of your own, post about my giveaway on your blog and post a comment telling me that you have told your readers. (The sidebar would be nice.... )

I once bought ONE raffle ticket and won a 7-day cruise for 2.  But I digress.....

I used to try to reply to readers when they entered my giveaways.  I just sent them a quick message thanking them for entering and wishing them luck.  I've given up on that.  When readers comment on my blog posts, I still try to reply. (I love chatting with you guys!)  I just won't be able to reply to all of the giveaway entries.  If you see your comments showing at the end of this post, rest assured that you are entered.

Questions?  Shoot me an email.

I hope you enjoy reading along as I use my GO! and share my thoughts and tips with you this month.  I'm so excited about getting started on my Double Wedding Ring!  Here we GO!!!!!!!!!

THIS GIVEAWAY HAS ENDED.  CONGRATS TO THE WINNER!

Saturday, October 2, 2010

Remember me?


I can't believe I haven't blogged in a month.  BAD, Sue!  I have an exciting month planned for all of my friends in blog-land.  I have a HUGE giveaway and I have lots of things to share with you that happened to me over the past month.  I have guild retreat photos to show you, pictures from classes I took from pattern designers at a trade show, pictures from my niece's wedding celebration, pictures of knitting projects, a few new recipes, and pictures of several of my latest quilt and sewing projects.  I even have a few free handbag patterns to share.  I will be working on the wedding quilt for my son and future daughter in law, and in between I'll sprinkle the above mentioned photos.  I'm resolving to be a better blogger this month!

I hate to post without a picture.  The above photo is me holding up a quilt top I finished at our guild retreat (more about that to come....).  The center is a panel from the Kingyo collection by Red Rooster.  All of the fabrics are from Kingyo.  It was super easy to put together since the borders were mostly from a border print.  The only thing that was time consuming was the 5 flowers along the right and the 4 circles on the bottom that had to be fussy-cut and appliqued on.... and mitering the corners of the large borders.  I really liked how it turned out.  Now to quilt it!

I see that several new readers signed up to follow this blog during September.  Welcome!  I'm glad to have you reading along.

I'll post my October giveaway tomorrow--- and it's a good one!

Sandie is the lucky winner!

Holy Cow!  346 comments to the giveaway post!  I used to try to reply to everyone who entered my giveaways, but I've given up on that.  And for the next giveaway, I'm sure it will be impossible.  So--- to everyone who entered- thank you for taking the time to comment and I appreciate all of your kind words.  Some of you even wanted my dog--- nice try.

Putting the number 346 into a random number generator, I came up with lucky number 59, who is "Call Me Crazy", AKA Sandie of crazyboutquilts

I took a peek at your blog, Sandie.  Funny- you have the same blog template as I do.  I also have 5 friends named Sandy/ Sandi/ Sandie.  Any way you spell it, I seem to know lots of neat people with that name.  Now I know one more!

I'll send you and email (unless you read this and get to me first).  You can look over my website- yardage, FQ packs- whatever.  I'll cut you 4 FQ's of your choosing- anything on the website.

Friday, September 3, 2010

September Giveaway

This is my golden retriever, Jaeger (pronounced YA-ger).  No- I'm not giving him away.  This picture shows Jaeger with his favorite pillow.  He's like a toddler dragging his blankie around.  If you come into our house, Jaeger will grab his pillow and show it to you.  You can't have it.  He just wants you to see it.  He even sleeps with it and puts his head on it.

Here are some of MY favorite things to drag around.... FAT QUARTERS!  I have baskets and baskets of them.  I sell fat quarters, I make fat quarter assortments for my website, and I give away a FREE FAT QUARTER with EVERY order from my website.  Unlike Jaeger- I don't just want to show them to you--- I want to give some away!

For the September giveaway, I'm giving the winner 4 fat quarters.  You get to pick!  I'll chat with the winner and she (or he) can pick from any fabrics on my website.

I'll select the winner at random on October 1st.  Past winners and international readers are welcome.  Please post comments to THIS POST for entries.... a separate comment for each entry.

For one entry- just tell me you want to win!  Nothing more to do.
For a second chance- post a second comment and tell me that you are a follower- long time follower or new follower- makes no difference.
For a third chance- go to my website and come back and tell me one of the FQ's you would select if you win.  Fabrics that a lot of you mention will probably end up in a FQ pack on the website. :-)
For a fourth chance- if you have a blog of your own- do a post about this giveaway, or better yet- drop it onto your sidebar.

I have a REALLY special giveaway planned for the month of October.... so stay tuned.... and Good luck!

Thursday, September 2, 2010

Look What I Got!

The UPS man knocked at my door and I wasted no time digging into the box!  It included my GO!, die, cutting mats, and lots of stuff I need to read!  Today was a busy day so I didn't get a chance to try it out.  Tomorrow is play day!

Wednesday, September 1, 2010

The August Giveaway Winner is Lindsey!

Happy September, everybody!  And an extra special happy September to Lindsey, 'cause she is the proud owner of a cute little quilt magnet set!


The random number generator read 78, so I counted down the comments on the giveaway post..... to the 78th comment..... and number 78 is "Hey, I'm Lindsey"!

I took a  peek at your blog(s), Lindsey.  My DH wants that car!!!!!!  Yea, right.... and I want a new kitchen!  :-)  Lindsey said on her blog that her friend got her started entering giveaways.  Well, Lindsey, call your friend and say, "Ha, ha!!!".

Send me a private message with your address and I'll give the magnets to the mail lady and tell her to point them in your direction!

I'll post a new giveaway this week.....

Congrats, Lindsey, and Happy Fall, Y'All!

Sunday, August 29, 2010

Free Motion Quilt Along

Christina has a blog she calls, "A Few Scraps".  I just recently discovered it and it's a good read.  She likes to do free motion quilting and she is doing a free motion quilt along.  It just recently started and it looks like she is going to have a very detailed series of tutorials.  I love to FMQ and I'm looking forward to following along and hoping to learn something new.  I put her button over on my sidebar (scroll down a bit), so check it out if it interests you.

Friday, August 27, 2010

A project finished and another one starting

I finished another pair of socks.  This was a sock club project from For Yarn's Sake (my LYS).  The project is called Italian Summer- featuring a pattern and yarn exclusive to the club.  The yarn was hand dyed with Walla Walla onion skins and Calendula flower petals.  Cool!  They're short- so they're nice in this transitional season.  And very comfy.

This pattern is done with an "afterthought heel".  I never tried this before so it was a learning experience. You can knit it top down, or toe up- it doesn't make any difference.  You put the heel in AFTER the rest of the sock is done.

You work the sock like a tube.  Where the heel will go, you knit a row with waste yarn (white- right side of photo).  When you're ready to go back and work the heel, you VERY carefully, remove the waste yarn to expose live stitches, and insert the needles.  Then you work the heel (left side of photo).  It's pretty easy, as long as you don't mind picking up the stitches when you remove the waste yarn.  And you have to kitchner stitch the end of the heel.  I like doing the kitchner stitch, so that was fun for me.

I started a new knitting project, but I'll only work on it when I'm riding in the car.  My main project for the next few months is a wedding quilt for my son and his intended.

I'm (deep breath) making them a king size double wedding ring quilt.  The wedding is in December.  If I fall behind- cheer me on, please!

The wedding colors are white, black and red.  It should be a beautiful winter wedding!  Here's the beginning of my pile of fabrics.  I'm collecting everything black and white and red that I can get my hands on!

Here's the exciting part!!!!!!  Even as we speak.... the men in brown (UPS) are transporting my new Accuquilt GO! to me!  Along with the cutting machine, I will be receiving several die sets- one of which is a double wedding ring!  Yea!  No cutting all those little pieces with templates!  I'll be showing the GO! cutting system to you as I learn to use it..

And I have a little (make that a BIG) surprise for you.  The October giveaway will be...... shhhh.... it's a SURPRISE!

Speaking of giveaways- just a few more days to enter the giveaway for the magnets.  If you haven't entered already, go over to the sidebar and click on the photo of the magnets.

Monday, August 23, 2010

Facebook, Our Anniversary Trip, a Safety Tip, and an Owie

Ahhh.... where to start.....
I haven't blogged in a few weeks.  Well... I did have a few posts in there that I removed.  I've learned a LOT about Facebook lately!  It seems that FB absolutely, positively doesn't want you to register with more than one email address.  I had a personal FB account with my personal email address.  Then I created a FB account for my business with my business email and attached a fan page to it.  Not good.  What I SHOULD have done is to create a fan page that I log onto with my personal email address.  It's then ok to put my business email address and other stuff related to the business on the fan page.  People who "frined" my personal FB page aren't automatically "Fans" of the business and vise verse.  So.... since I messed this up... the logical thing is to delete the page I created for the business, and create another one the correct way- right?  Not so easy.  You can delete an account on FB, but when you log onto FB in any shape or form... even to "like" something.... your account reactivates.  If I even look at the Alderwood Quilts Fan Page, my AQ account that I'm trying to delete reactivates.  The only way to make a page go away for good is to delete it and then to TOTALLY stay away from FB for 2 weeks.  So.... I deleted the business page and fan page (basically, I deleted my identity with the business email address).  When 2 weeks pass, I'll get back on and try to create a business fan page with my personal email address.  Wish me luck!  To all of you who have become fans- hang in there- I'll be posting in a few weeks!


DH and I celebrated our 35th wedding anniversary last week.  We met in high school (awwww.....) and married 5 years later.  We always like to do something for our anniversary.... just take a little time to set aside the cares of our lives and focus on each other.  Usually it's just a day trip or a night or 2 away.  This year, we went to Washington- around the Seattle area.  That's about a 3-4 hr drive north from our home near Portland, Oregon.  We stayed in Everett, and did some touristy things.  We took one day to explore Whidbey and Fidalgo Islands.  There are a lot of islands just off Seattle and the surrounding areas.  Some belong to Washington and some are Canadian.  Most are easily accessible by ferry.  I'm just a little kid around water, boats and ferries.  I just love ferry rides!


The islands all have their own flavor.  Some are mostly residential, some recreational, and some have a lot of shopping and art.  The US/ Canadian border weaves through the islands and there are 2 ferry lines- one Canadian and one Washington State Ferries.  All of the ferries we've been on over the years gave us great rides and got us to our destination. 

Whidbey Island has it all- residential, recreation, and shopping!  As luck would have it, there was an Art and Craft Fair in one of the little towns while we were there. AND... there was a very cute yarn shop in Langley where I got a beautiful skein of sock yarn (you'll see that when I start a pair of socks with it).  I tried to visit the quilt shop, but got there right after closing time.  Dang!


We drove all the way up Whidbey Island and over a bridge with AMAZING views to Fidalgo Island.  While on Fidalgo, we had lunch at the Rockfish Grill and Anacordes Brewing Company in Anacordes.  They had a great yarn shop, too!  (Like how I always manage to find the yarn and quilt shops?)


Above is a lighthouse park near the ferry at Mukilteo.  We also spent an evening walking the waterfront at Mukilteo (near Everett).  We had a fun dinner at Skuttelbut--- another brewery.  For those of you not familiar with the Pacific Northwest, we are famous for coffee shops, wineries and breweries.  We have beverages covered!

We spent our last day touring the Boeing Airplane Factory.  OHMYGOSH!  It was incredible.  It's the largest enclosed building in North America.  It has to be big to hold a bunch of airplanes!  No pictures.  We couldn't bring handbags, backpacks, fanny packs, cell phones, cameras, or ANYTHING electronic... nothing that could record anything.  All I can say is that, if you are ever in the area, set some time aside to tour Boeing.  There are 2 facilities- one in Everett and one in Seattle, and during most of the year you need to make reservations online in advance.

Now for the safety tip.  If you'll notice, I never tell you about major events or trips until we're home.  It seems to me that posting it on the internet that you are going away for 3 days is like putting a key under the mat and advertising for a burglar on Craig's List.  You always hear in the news about people being robbed while on their honeymoon or when they are at a family funeral.  It's just not safe to say some things on a blog until after they happen.  At the very least- if you are excited and want to post about a trip you are planning, just say it's coming up but don't post the dates.  One time, I read a post where a woman said her dog is good when they leave him alone every day, all day, while they are at work.  Please don't post things like that!  I don't want to read about bad things happening to you!

And last but not least- I have an owie.  That's why I haven't posted in a few days.  I had some minor surgery last week.  I'm fine.  Nothing bad.  I am tired and sore, but I'm feeling better every day.  DH is taking VERY good care of me.  I've been napping and knitting and enjoying visits from my sons and DIL.  Life is good. :-)

Friday, August 6, 2010

August Giveaway

Here's a fun little giveaway for August.  It's a set of 4 magnets in a little tin by That Patchwork Place.  The set retails for $12.95

The winner will be selected using a random number generator on September 1st.  Past winners and international readers are welcome to enter.

To enter- all you have to do is comment on THIS POST that you would like to be entered.  For a second entry, do a second reply, and let me know that you are a follower.  For a third entry, make a third comment letting me know that you have posted about the giveaway on your own blog.

Good luck!

Thursday, August 5, 2010

It's all harvested- now to get it all dried!

We finished harvesting the lavender last weekend.  My goal was to get it all in before we turned the page on the calendar to August!  OK... so I turned the page on August 2nd.  It would have been better to get the last of it cut a week earlier but there are only so many hours in a day... and my days never seem to have enough hours.  Our little farm of 300 plants yielded us 1500 bundles this year.  It's the third harvest for most of these plants and we were VERY pleased! 

I wanted to show you how we cut the lavender.  We use sickles, which are half - moon shaped knives.  We grab a bunch with one hand and use a sweeping motion with the sickle to slice it.  Gotta love sickles!

Whatever didn't sell as fresh bundles ended up being dried.  DH hung long chains from the ceiling of the old horse stall in the back of the barn.  We secure the bundles with rubber bands when we harvest.  Then we twist paper clips open (so they look like an "S") and hook one end of the paper clip into the rubber band and one end into a chain link.  They hang upside down and we hook them in a spiral fashion to give them maximum air flow.  Each chain can hold about 50 bundles.  We also have fans going in there.  It's very humid with all of that fresh cut lavender.  People often say how wonderful it must smell!  Honestly- I can hardly smell it any more.  My nose has been bombarded with lavender for so long that I can't smell the lavender.  I smell other things just fine.... just not lavender.

Even though I can't smell the lavender, when we take the buds off, there is quite a bit of "dust" kicked up.  I start sneezing and get a runny nose.  I'm not allergic to it... it's just a matter of all that particulate matter in the air.  So this part is best done outside.  We pull the dried lavender off the chains.  The trays they are in have screen bottoms for air flow, and to sift out the very fine particles.  This photo is showing about a  hundred bundles.

DH sets up the canopy and a few tables for me and I just enjoy being outside while I play with my purple bounty.

To claim just the buds, I rub the dried bundles between my hands.  They just fall off!  Then we sift them twice and bag em' up to sell on the website.  We use them for lavender dryer bags, sachets, sell to people for wedding toss and bulk for crafting.  There ARE commercial machines that shake the buds off and sift them, but our operation isn't large enough to justify that expense.  As long as we keep the farm to this size, the old fashioned hands- on method is just fine.  I do have some local friends who like to come play with me for a day here an there and it makes the work go faster.

I have the buds off of most of the dried bundles- about 300 bundles still hanging to dry.  It's been a very good harvest and very rewarding to see so many nice quality buds for our efforts.

Tuesday, August 3, 2010

Tips about Fusible Web

I was chatting online with a customer today about fusible web and it dawned on me that I have some of that same conversation with others.... so I thought I'd share some info with you.  Some of you most likely know more than I do about this, so if you're one of them- sorry this will be boring.  But many people are new to fusible applique and I want to cover a few basics.  (This is JUST the basics)

Fusible applique in a nutshell:  You take fusible web, which is paper on one side and some sort of sticky stuff on the other side.   There are a lot of different brands with a lot of different properties, but the idea is to trace or draw a design on the paper.... then fuse (iron) it onto the back of the fabric.  Then cut out the shape you drew on the paper... you'll be cutting paper and fabric together because they are stuck together now.  When you peel the paper off, your fabric is now an iron-on applique.

If you're doing a complicated design, you will do well to use an applique pressing sheet.  You can see through it, so you can put the large pattern "map" down under it, and place the pieces on top where they belong.  Press lightly, and they will stick to each other, but not to the pressing sheet because it's non-stick.

There are lots of great little irons and pressing tools, but you can use whatever you want.  If you're doing a lot of this stuff, invest in a little iron.  If you just want to try it- you can use your regular iron.

Here's my big tip.... fusible web has a lifetime.  It gets old.  DON'T buy a bunch of it!  It isn't fabric and you can't stash it.  Get what you need for your project and use it.  Don't get it yet if you aren't sure when you're going to get around to the project.  Share with friends.  Have you ever had old fusible web separate from the paper before you ever get the chance to get it near an iron?  That's what I'm talkin' about!  When it's older, the layers separate.  I am not going to endorse a brand of fusible web because it's a personal choice, AND it depends on the season and where you live.  Some work better in humid areas and some better in dry climates.  Some are better in cold and some in warm climates.  I'm not kidding.  And everybody swears by her own favorite.  What to do?  If possible, as a friend who has some for her scraps.  Or try to find it by the yard and just buy 1/8 yard of all of the brands and play.

And the best advice I can give you is to READ THE DIRECTIONS!  If they say 10 seconds... 30 seconds isn't better.  Heat n' bond, for instance, will stick very well after a certain amount of time (as per the directions), and then if you overheat it, it will let go and you can't get it to stick again.  Some are pressure sensitive, some heat activated, and I swear there is probably one that tells you to hop on one foot an rub your belly to make it stick!  Kidding aside- no matter how many times you've done this, and you think you know what you're doing.... still read and FOLLOW the manufacturer's directions.

Lessons here?  Read the directions and use fresh stuff.

Is anybody interested in a tutorial on fusible applique?  Are there any other quilting techniques you'd like to see here?  Tell me what you'd like to learn about.

Monday, August 2, 2010

Getting Things Done

I'm sure that every one of you has a list longer than the days of the year of things they want to complete.  I have sooooo many things I want to do!!!  I look at it this way.  I have many projects that I am "considering".  I select them one at a time--- from a long list of projects that look interesting to me.  It really is OK if I see something I like and I think I want to make it.... and then I never select it from among the many projects that have caught my eye.  Lately, I've donated a few of those to people who are making quilts and knitting blankets for others in need.

I am primarily a quilter, but lately I have been knitting a lot. That is due to available time.  I've been harvesting lavender and working on rearranging my quilt area during time I would generally use to quilt--- and using "found time" such as riding in the car, to knit.  That's OK for now, and soon you will see that I am doing more quilting than gardening and knitting.  It's all about what fits into my life that week.

The important thing is to do SOMETHING, and do be mostly productive most days.  I don't think there's anything wrong with having a few days where we don't feel productive, as long as we have fun or relax during those times.

A blog buddy of mine, Sue Abrey from the UK has a great idea on her blog.  She is suggesting that we take one day a month to work on Christmas projects.  I'm really not backed up on Christmas projects, but I AM backed up on some other things!  The concept is a good one.  I added her button to my sidebar.  If you'd like to join her and others in the fun making projects for Christmas- check out her blog.  She's a really nice lady.  :-)

As for me... I've stopped promising things on the blog because I feel terrible when I don't get them done in a timely manner.  I still haven't finished my "Dozen Bags" project (I will eventually) and I had hoped to put a BOM on here (still want to).  Right now- I am working on a wedding quilt for each of my daughters-in-law, and a few projects for people who have asked me to do things.  I know all too well that the way to get things done is to plan to do them- to make an appointment with yourself and keep the appointment!

So here's to getting things done.  My DH always says that the way to eat an elephant is one bite at a time.  Elephant Stew... yum

Elephant Stew

1 Elephant (medium size)
2 rabbits (optional)
A lot of salt and pepper
A Lot of gravy

Cut the elephant into bite-sized pieces.  This should take about a week.  Add enough brown gravy to cover.  Cook over hot coals for about 4 weeks.  This will serve 3,800 people.  If more are expected, 2 rabbits may be added, but only do this if necessary because some people do not like to find a hare in their stew.