Remember MaryAnne from Gilligan's Island? Evidently, she knows more about how to peel potatoes than she does about how to get of a deserted island. :-)
Monday, March 14, 2011

Sunday, March 13, 2011
Awesome Sloppy Joe's

1 pound ground beef
1 cup ketchup
1/3 cup water
2 teaspoons brown sugar
2 teaspoons Worcestershire Sauce
2 teaspoons yellow mustard
1/2 teaspoon garlic powder
1/2 teaspoon onion powder
1/2 teaspoon salt
4 hamburger buns (we like onion buns)
shredded Parmesan cheese
Brown and drain fat from ground beef
While meat is browning, combine all remaining ingredients except buns and cheese.
After draining fat from meat, add the sauce ingredients. Bring to a boil, reduce heat, cover and simmer for 30 minutes. If mixture starts to dry out, add a little water.
Serve on rolls topped with Parmesan cheese. ENJOY!
Wednesday, March 9, 2011
Sewing & Stitchery Expo 2011

I took a little trip to Puyallup, Washington last weekend. Every year, they have a sewing and stitchery expo- a smorgasbord of all things fiber. It's a few hours north of the Portland area and I try to attend most years. This year, I drove up with my friend, Jean. She was sweet enough to drive so I could knit in the car. :-) The show is held at the fairgrounds, and is a very nice facility.

They had about 200 vendors- quite a bit to get through in a day! Most were fabric and sewing related. A few sold yarn or beads. They also had classes and trunk shows and a few other events. I've taken classes in past years, but this year I just browsed through the marketplace.

One of my favorite vendors is always the Pendleton Wool Store. Pendleton wool is made in Pendleton, Oregon and has a history that goes back to the early days of settlement in the northwest. We have a few of their blankets and I treasure them. They also sell the wool by the yard. I just DROOLED over this coat! The little pin that matches is a flower made from a twisted zipper. Zippers were big at the show--- fashion zippers sewn into garments and zippers used to make jewelry.


This little guy has always been one of my favorites. I guess you have to like contemporary interpretations of dogs to appreciate this--- but this guy reminds me of my Golden Retriever (who is feeling better, by the way). The pattern name is Sundance. Anyway- I think he's a cutie.

I stopped to chat a bit with Lorraine Torrance. I carry some of her patterns. She only has a few quilt patterns. Most are by other designers that are published by her company. Lorraine's specialty is designing clothing patterns. She does gorgeous work.

I love the vest on the left. It's like a quilt that you wear, isn't it?

This is the Sunspots pattern. This sample looks so different from the pattern cover! I've seen it done by several quilters and I'm always amazed at how each quilter interprets this design.

This made me chuckle. I love feathers. The above sample was in a thread company booth. I wish I remembered the name of the thread (sorry!). Anyway- the embroidery designs are really cool and the threads really bring them to life. But what made me chuckle was remembering a shirt I used to own. It was a white shirt, and had a feather embroidered on the back shoulder. Everybody kept trying to pick it off! It looked like something was on my shirt. No more embroidered feathers on my shirts!

Monday, March 7, 2011
March Giveaway
The March giveaway is WEEKEND WONDERS.
 This is a 16-page pattern booklet with instructions for 5 beginner-level quilts along with quilting basics. Great book for the new quilter or for an experienced quilter who is looking for a quick project that looks great.
To enter, all you have to do is COMMENT TO THIS BLOG POST and ask for a chance to win. It's that easy!
For a second entry, if you are a follower of this blog, post a SECOND COMMENT to THIS POST and let me know that you are a follower. It doesn't matter if you are a long-time follower or if you just signed up 2 minutes ago.
For a third entry, if you have a blog of your own, do a blog post about this giveaway, or put it on your sidebar... whatever you like. Just tell your readers about this giveaway somehow, and do a THIRD COMMENT to THIS POST and let me know that you told your readers about the giveaway.
I'll select a winner at random on April 1st. Good luck!
I try to reply to most comments to my blog posts. If you are only commenting to enter the giveaway, I probably won't send you a personal reply. If your comments show up at the end of this post, then you're entered. If you've made other comments to my blog posts and have never heard from me, it probably means that you are a "no reply" commenter. That means you have chosen to keep your email address private. That's fine, but it means I can't contact you to chat or to let you know if you have won. If you wish to remain anonymous, be sure to check back on April 1st or 2nd and see if you've won. If I can't connect with the winner, I'll have to draw another name.
While we're on this subject... I have a suggestion for those of you who want to keep your email private, but would like to comment and play along with various activities on the internet. Consider opening another email account.... a free one with yahoo or gmail, or hotmail... or many others. Keep that email address for receiving newsletters, entering contests, posting on blogs, etc. You can even use it when you order things online or for a facebook account. This keeps your personal email pretty clear of junk mail and keeps spam way down. You should check it from time to time to see if you've received any emails from actual people (like me!), but most of the email you really want will be in your clutter-free personal in-box.
I'm always sad when I receive a nice comment or a question from a reader and I can't reply. Often, the person doesn't even realize that I can't reply. Many people who show up as "no reply" don't know it.
While I'm on a roll here.....
In the past week, several people have asked me how to reply. I don't have one answer because everybody has different accounts and settings and what-have-you. But I think the most helpful thing for most people is to get a google ID. I think if you try to reply and don't have one, it will ask you if you want one. If you're having particular problems commenting, send me a private email and I'll see if I can help.
Good luck to all...

To enter, all you have to do is COMMENT TO THIS BLOG POST and ask for a chance to win. It's that easy!
For a second entry, if you are a follower of this blog, post a SECOND COMMENT to THIS POST and let me know that you are a follower. It doesn't matter if you are a long-time follower or if you just signed up 2 minutes ago.
For a third entry, if you have a blog of your own, do a blog post about this giveaway, or put it on your sidebar... whatever you like. Just tell your readers about this giveaway somehow, and do a THIRD COMMENT to THIS POST and let me know that you told your readers about the giveaway.
I'll select a winner at random on April 1st. Good luck!
I try to reply to most comments to my blog posts. If you are only commenting to enter the giveaway, I probably won't send you a personal reply. If your comments show up at the end of this post, then you're entered. If you've made other comments to my blog posts and have never heard from me, it probably means that you are a "no reply" commenter. That means you have chosen to keep your email address private. That's fine, but it means I can't contact you to chat or to let you know if you have won. If you wish to remain anonymous, be sure to check back on April 1st or 2nd and see if you've won. If I can't connect with the winner, I'll have to draw another name.
While we're on this subject... I have a suggestion for those of you who want to keep your email private, but would like to comment and play along with various activities on the internet. Consider opening another email account.... a free one with yahoo or gmail, or hotmail... or many others. Keep that email address for receiving newsletters, entering contests, posting on blogs, etc. You can even use it when you order things online or for a facebook account. This keeps your personal email pretty clear of junk mail and keeps spam way down. You should check it from time to time to see if you've received any emails from actual people (like me!), but most of the email you really want will be in your clutter-free personal in-box.
I'm always sad when I receive a nice comment or a question from a reader and I can't reply. Often, the person doesn't even realize that I can't reply. Many people who show up as "no reply" don't know it.
While I'm on a roll here.....
In the past week, several people have asked me how to reply. I don't have one answer because everybody has different accounts and settings and what-have-you. But I think the most helpful thing for most people is to get a google ID. I think if you try to reply and don't have one, it will ask you if you want one. If you're having particular problems commenting, send me a private email and I'll see if I can help.
Good luck to all...
Thursday, March 3, 2011
Glass Blowing
This is another "catch up post". I still have a lot of things I never got around to blogging about. I'll pop them in here and there.
A few months ago, I spent some time on the Oregon Coast with my friends, Liz and Diane. Liz surprised us with the trip, and took us to a glass blowers in Lincoln City, Oregon. While Liz took these photos, Diane and I took turns working alongside a professional glass blower who helped us to make our own glass bowls. Can you believe it? I was a glass blower for a day! Well... sort of. I did it, but I was expertly guided every step of the way.
In case you're ever in the northwest and want to try this, the studio is called the Jennifer Sears Glass Art Studio. You can make all kinds of things- not just bowls. You should see their gallery--- WOW!

Here's where it all started. This is a pile of various shades of green glass pieces.

I have no idea what all this stuff is called, so if you know anything about glass blowing- forgive me and just chuckle as I try to describe this.
Here we are, dipping into the big oven full of molten glass for a starter "blob" of molten glass. (See... I told you I don't know what this stuff is called).

Now the blob of molten glass, which is pretty much colorless (I think) gets rolled in the green pieces.

I felt like I was rolling snickerdoodle dough in cinnamon sugar.... only the dough was a bazillion degrees and heavy.

We went through several rounds of heating and shaping, heating and shaping. The green glass is there.... it really is.... it's just really hot and looks orange.
Here I have a tool that sort of looks like tweezers and I'm taking bites out of the glass and twisting my wrist. This makes the green go all swirly. You'll see later.

Back into the oven. There's a stand that I am resting the rod onto as I keep rotating the glass. This is really work! The long metal rod is heavy enough, and there's a big chunk of glass waaaaaay on the other end that wants to drip to the floor if I don't keep rotating it.

Here the guy who actually knows what he's doing is shaping the glass in this rubber cup thing. I'm standing there with my big yellow gloves in awe of his skill.

Then he attached a long tube to the end of the rod that has the glass on it.and told me to gently blow into it.
I kept blowing into the tube and then I heard a POP. The glass blew a little hole at the end.

Then back into the oven.....

And now we take the tweezer thingies again and start opening up the hole.
Back into the oven.... open it up a little more.... back into the oven....

And now the real magic begins. I kept swirling it and opening it as the weight of the glass started to fold back onto itself and create ripples.
You can see that he is allowing it to cool and it's starting to look green.

Is this cool, or what?

To get it off the rod, he's using a sawing motion to cut the base. The highly specialized tool he's using is a kitchen knife. (I know what that's called)
I don't have a picture of it, but he turned it upside down on a towel, and popped the rod with a hammer (maybe it was a mallet) and the rod separated from the glass.
 He took a small piece of molten glass and applied it to the base. He's using what looks like some kind of trowel to shape the foot of the bowl.
Then he put it right into an oven which was really hot, but not hot enough to melt the glass again. The bowl had to stay there overnight as the oven lowered temperature very slowly. This creates a stronger glass piece without hairline cracks. We had to come back the next afternoon to get our bowls.
 Diane went through the same process and made a purple bowl. When we returned home, Liz took this picture of us in front of her dahlia garden.... nice backdrop for our colorful bowls!
I still can't believe I made a glass bowl!
Thanks, Liz and Diane. I had a memorable trip to the beach... and I have a bowl to remind me of it.


A few months ago, I spent some time on the Oregon Coast with my friends, Liz and Diane. Liz surprised us with the trip, and took us to a glass blowers in Lincoln City, Oregon. While Liz took these photos, Diane and I took turns working alongside a professional glass blower who helped us to make our own glass bowls. Can you believe it? I was a glass blower for a day! Well... sort of. I did it, but I was expertly guided every step of the way.
In case you're ever in the northwest and want to try this, the studio is called the Jennifer Sears Glass Art Studio. You can make all kinds of things- not just bowls. You should see their gallery--- WOW!

Here's where it all started. This is a pile of various shades of green glass pieces.

I have no idea what all this stuff is called, so if you know anything about glass blowing- forgive me and just chuckle as I try to describe this.
Here we are, dipping into the big oven full of molten glass for a starter "blob" of molten glass. (See... I told you I don't know what this stuff is called).

Now the blob of molten glass, which is pretty much colorless (I think) gets rolled in the green pieces.

I felt like I was rolling snickerdoodle dough in cinnamon sugar.... only the dough was a bazillion degrees and heavy.
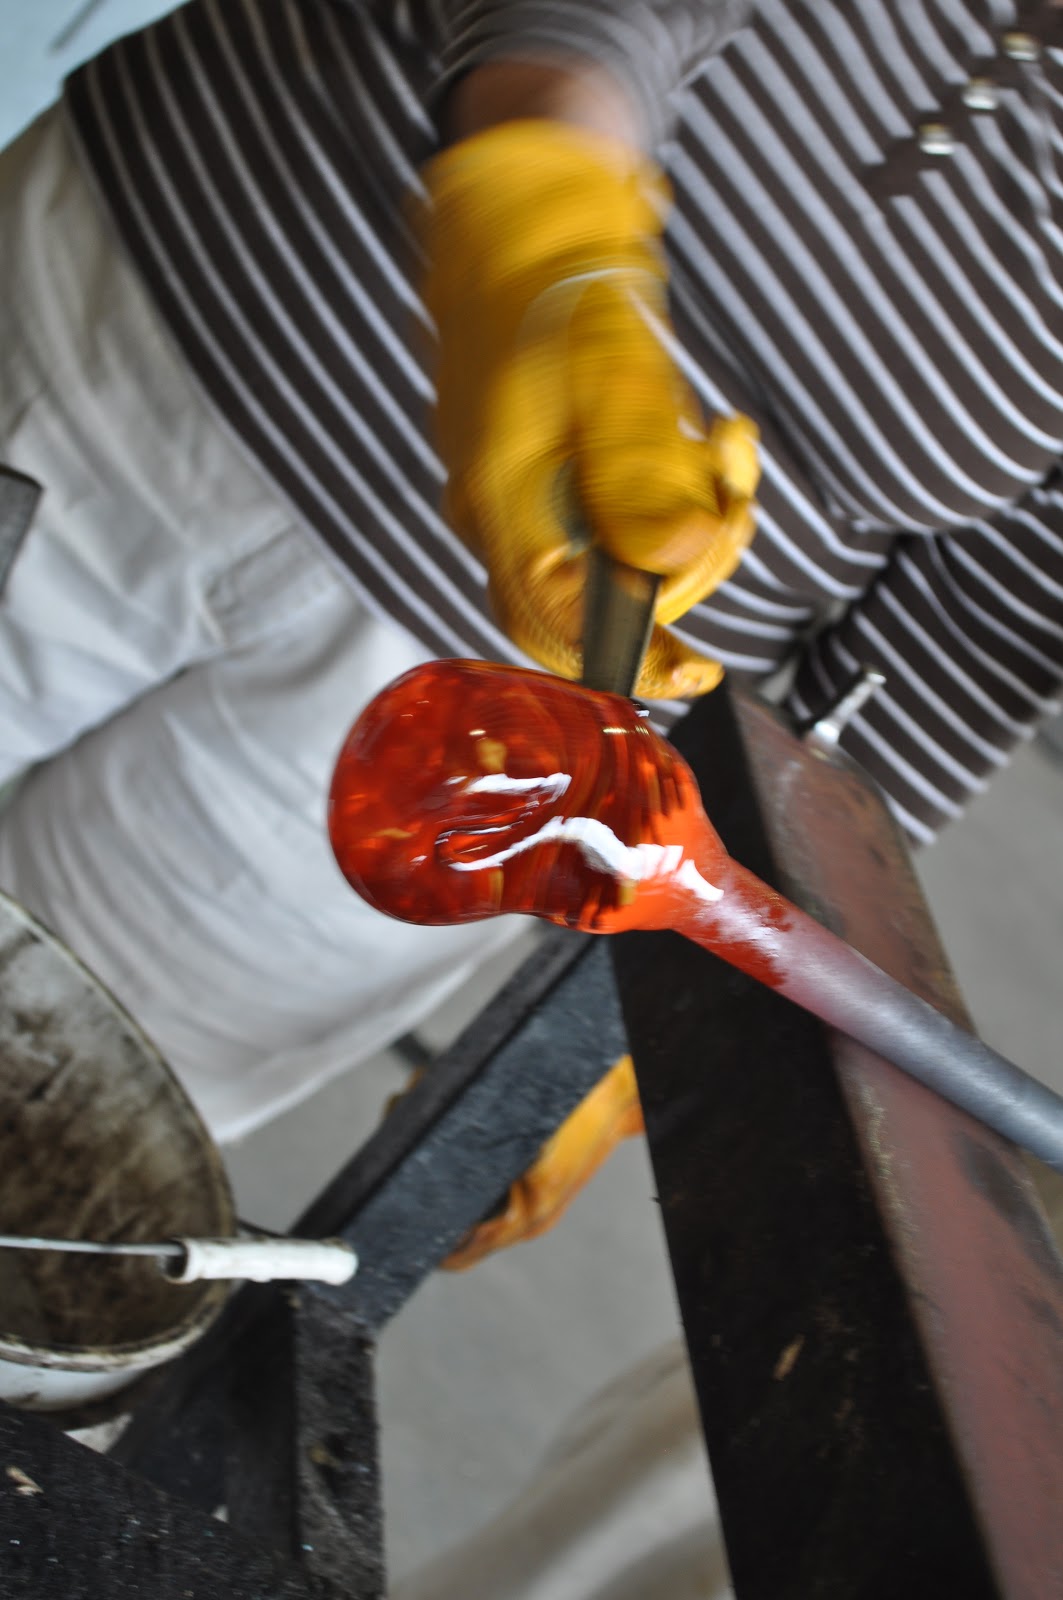
We went through several rounds of heating and shaping, heating and shaping. The green glass is there.... it really is.... it's just really hot and looks orange.
Here I have a tool that sort of looks like tweezers and I'm taking bites out of the glass and twisting my wrist. This makes the green go all swirly. You'll see later.

Back into the oven. There's a stand that I am resting the rod onto as I keep rotating the glass. This is really work! The long metal rod is heavy enough, and there's a big chunk of glass waaaaaay on the other end that wants to drip to the floor if I don't keep rotating it.

Here the guy who actually knows what he's doing is shaping the glass in this rubber cup thing. I'm standing there with my big yellow gloves in awe of his skill.

Then he attached a long tube to the end of the rod that has the glass on it.and told me to gently blow into it.
I kept blowing into the tube and then I heard a POP. The glass blew a little hole at the end.

Then back into the oven.....

And now we take the tweezer thingies again and start opening up the hole.
Back into the oven.... open it up a little more.... back into the oven....

And now the real magic begins. I kept swirling it and opening it as the weight of the glass started to fold back onto itself and create ripples.
You can see that he is allowing it to cool and it's starting to look green.

Is this cool, or what?

To get it off the rod, he's using a sawing motion to cut the base. The highly specialized tool he's using is a kitchen knife. (I know what that's called)
I don't have a picture of it, but he turned it upside down on a towel, and popped the rod with a hammer (maybe it was a mallet) and the rod separated from the glass.

Then he put it right into an oven which was really hot, but not hot enough to melt the glass again. The bowl had to stay there overnight as the oven lowered temperature very slowly. This creates a stronger glass piece without hairline cracks. We had to come back the next afternoon to get our bowls.

I still can't believe I made a glass bowl!
Thanks, Liz and Diane. I had a memorable trip to the beach... and I have a bowl to remind me of it.


Wednesday, March 2, 2011
Learn to Knit Socks

If you don't know about Ravelry.com... you really need to! It's the most amazing resource for the knitting community! It has tons and tons of patterns (some free, some for purchase), lots of yarns and where to get them, links to stores, and best of all.... PEOPLE There are more chat boards than you can shake your needles at. One board is moderated by the owner of Knitters Brewing Company. Wendy Gaal and her friend, Kellie, hand dye the most wonderful yarn in every color imaginable. And they have regular KAL's (Knit- alongs). Most of her original designs are very challenging. But this month, they are doing a KAL to teach knitters how to make basic socks. There is the assumption that you know the basics of knitting and purling. But there's no doubt that new sock knitters will be successful with this KAL. The pattern has lots of pictures, and there will be videos on the chat board to show you some of the techniques. And if you get stuck, all you have to do is ask a question on the board and you'll have answers lickety split.
There is no charge and no purchase necessary. The pattern (photo above) will appear on the chat board mid March for free. But if you do order the kit, you will get a commemorative stitch marker, your choice of a bazillion colors of yarn, and the pattern already printed out. There are random prizes drawn from those who post a picture of a finished sock. If you use Knitters Brewing yarn, you are illegible for the grand prize. It's up to you- you can buy the kit or use yarn you have.
I've known these women for a while and they are really great. If you've always wanted to learn to knit socks, or if you tried with less-than-great results, think about playing along!
Oh- and they also have a pod cast and a blog called Yarn on Tap. Enjoy!
Lots of S's.... Socks, Snow and Sniffles


So far... 2 pair in 2 months. Let's see if I can keep up the pace! I'm casting on the third pair this week.

to work with. Love the pattern, too!

It was a heavy, wet snow... kept going between rain and snow. The snnow was so heavy that it took down several tree limbs out back. It was really creepy last night listening to the crack, snap of the limbs in the woods. One big one woke me up in the middle of the night. Ugh!


I seem to be posting a lot of pathetic looking family dog pictures on this blog lately. Our grand-dog, Cooper, is doing better- his paw is healing. Sheesh!
I got some fabric to get started on my second double wedding ring quilt, and as I promised, I will do a very detailed tutorial for you. I think I might try to do a weekly post on the Wedding Ring quilt as I progress. Maybe that will keep me on track. I was rushing so much with the other one that I didn't take a lot of pictures of the process. I will do that with this second one. I also have some things in the works for the website- new kits and patterns and a few tutorials. Stay tuned! As soon as I get over this cold and find some energy, I'll get that sewing machine humming!
Tuesday, March 1, 2011
The February Giveaway Winner is Melissa!
Melissa whose blog is called Ardea's Nest. is the winner this month. Congrats, Melissa! It's great to have you as a follower of my blog.
Judging from her blog, it looks like Melissa is never at a loss for projects. But now she has one more. I think there might soon be a new little daisy quilt on her project list. The pattern and daisy fabric will be on their way to you in a jiffy, Melissa! Be sure to check out Melissa's blog. There's a lot of great stuff on there- I signed up to follow, too!

Judging from her blog, it looks like Melissa is never at a loss for projects. But now she has one more. I think there might soon be a new little daisy quilt on her project list. The pattern and daisy fabric will be on their way to you in a jiffy, Melissa! Be sure to check out Melissa's blog. There's a lot of great stuff on there- I signed up to follow, too!

Thanks to all who entered the giveaway. I'll have a new giveaway posted for March soon.
By the way- I just have a few yards of the daisy fabric left, and a few patterns. I matched up the daisies needed with the patterns and put them on my "Last Chance" (sale) category on the website.
We had a late winter snow storm over the past few days here in the pacific northwest. I surely will be happy when we see real daisies growing.
Friday, February 25, 2011
I Won!
Is this cute, or what?
 I recently entered a giveaway on Eileen's blog, Ladybird Lovelies. I don't enter giveaways too often, but I have been lucky and won a few over time. Eileen made this little "Possibles" bag. It's full of little pockets and hooks and has a nice handle and an easy hook and loop closure. And look what she put inside it for me....

Thanks so much, Eileen! It arrived on a snowy day- just the thing to perk up my day. You do beautiful work.


Thanks so much, Eileen! It arrived on a snowy day- just the thing to perk up my day. You do beautiful work.
Monday, February 21, 2011
Why is the price of fabric going up?????

Most quilters have noticed that the price of quality fabric has been skyrocketing lately. At Alderwood Quilts, we are committed to selling high quality fabrics, even if that means increases. Sadly, increases are inevitable. Every shop is making their own decisions about how they market their products. I just wanted to give you some food for thought, as you decide where to shop and how to spend your fabric budget. Above all, please don't take out your frustration on the nice person cutting your fabric. Believe me- they dislike the increases even more than you do!
You may have heard that cotton prices are going up. If you'd like to understand more about it, here are some statements by some people who manage the top fabric manufacturers. This is a link intended for shop owners and is one of the best documents I've seen to explain the reason for the price increases.
I recently heard someone say that shop owners must be happy that the cost of fabric is on the rise because it means more profit per yard to us. WRONG! In the first place, we actually care about our customers and we're not happy when friends are in pain. But from a business standpoint, this is not working out to our favor. Higher wholesale costs mean that we have to spend more to maintain inventory. Customers often have a dollar amount they can spend (as opposed to just buying whatever they like). Assuming that a customer is going to spend the same amount that they always have, this means that she will be purchasing fewer yards of fabric per month. In order for the shop owner to have the same selection (number of bolts), she will be spending more for that inventory and getting fewer sales (purchases) with slightly higher profit per sale. At best, this adds up to a break even. At best. Please don't take this as me "whining". Being in business means challenges. That's the way it goes. Fabric retailers have to step up to the plate and be creative about how they market fabric. They need to step up the customer service. They need to maintain a good attitude. It's what it takes to stay in business. I'm just letting you know that we aren't raking in the money just because the price of fabric is going up. Believe me- we're just as upset as you are!
So waddaya do? Our budgets are pinched and prices are going up and we just LOVE to quilt! You love that new fabric but your wallet doesn't love it... what's a girl to do???
*Consider buying some fabric from a new collection as a focus fabric and using fabric from your stash to coordinate with it.
*Consider alternating projects... buy new fabric for one quilt and then use fabric from your stash for the next... alternating back and forth throughout the year.
*Why not swap with a friend- "shopping" at each others' stashes, and then fill in what you need by purchasing new fabric to go with it.
*Consider selling some of what you make, or selling your services as a quilter. If you don't feel that your skills are strong enough to quilt for pay, maybe you can do sewing repairs, sew on scout patches, buttons, do hems, etc. Ask around and let the word out that you will do small repairs for a reasonable fee. Then stash that money away to pay for new fabric.
*Consider purchasing kits. The fabric for kits is cut to the amount needed, with less leftover fabric than if you purchased yardage. The price of a kit is sometimes (not always) a tad bit higher to compensate the seller for cutting time. But it still generally more cost effective because of the efficient use of fabric. Of course, it means you aren't making your own fabric selection, but it may work for you sometimes.
*Keep your eyes open for sales at your local quilt shops and share the news of deals with your friends. Sign up to receive newsletters from your favorite local quilt shops and online shops so you will be notified of sales.
***Important*** Buy the best quality fabric you can afford. It's better to make one quilt with quality fabric than 3 quilts that are going to fade and fall apart. Your time is worth the cost of quality fabric. Send the fabric manufacturers the message that we don't want them to compromise on quality!
Please do consider all options for purchasing fabric. All fabric retailers- the large fabric and craft shops, the small independent local quilt shops... large and small online shops.. are feeling the pinch these days. Many local quilt shops have been closing in recent years, and I have to believe that the new price increases are going to cause even more to close down. That's very sad. I'm not telling you how or where to shop. But do consider that when you make a purchase, you are supporting THAT business and that business model. Do you want the large "big box" stores to grow bigger and have a great selection and always be there for you? Do you want the small local quilt shops with teachers and knowledgeable staff to assist you to stay in business? Maybe you want both? You vote with your dollars. Just as every vote counts in a political election, so does every purchase count (no matter what you're buying). There's a woman (the fab shop hop lady- the find-the-bunny shop hops) who says we should promote spending at regular portion of our quilting dollars at our local quilt shop. Even if you regularly shop with the big stores, spend a portion of your dollars at small independent stores if you want to see them stay in business.
I know-- it still stings. I wish I had better news for you, but the sad truth is that quality fabric is going up. (Don't shoot the messenger, please!)
Saturday, February 19, 2011
Website Changes
I'm a happy camper! My "web guy" is making some changes to the website. We met with him a few months ago and we're gradually phasing in some upgrades to make shopping on the Alderwood Quilts website easier and more inviting.
 Since we've had the website up and running (3 years, now), we have loaded 10 products per page, and customers have had to "page forward" and back to view 10 products at a time. Now (YEA!) you can just scroll down to see all of the products in that category. This will make it easier to look up and down through the options to make your selections.
There are more upgrades coming, including a new look to the homepage. This is fun!


There are more upgrades coming, including a new look to the homepage. This is fun!
Wednesday, February 16, 2011
It's all fun and games until somebody ends up in a cone

Tuesday, February 15, 2011
Westside Quilters Guild Fall, 2010 Retreat
This is a "catch up post". Our guild had a retreat last fall right around the time that I fell off the blog wagon. It was several months ago, but I thought you might like to see what my friends made. This was taken on the last day right before we cleaned up to go home. I'm on the top row- second from the right- bleary-eyed from sewing all weekend.
 Our guild offers speakers at each monthly meeting, and several classes and workshops throughout the year. For our retreat, we have some little mini-demonstrations, but no real classes or instruction. It's simply a time for each of us to bring our own projects and spend the weekend in the company of friends, working on our quilts. It's something I look forward to. I get to sew all weekend, talk with friends while I'm sewing, and somebody else makes my meals. Doesn't get any better than that!
On Sunday before we left, we had a "show and tell" and shared what we made. My apologies to a few of the ladies- I managed to accidentally delete a few pictures. If you're not on here, it isn't because I didn't like your quilt. It's because I was camera-challenged that day. My bad.
 Shirlene is always so focused. She has everything planned out and she's super organized. She just gets down to work and sticks with it. She always accomplishes a LOT. This is one of her "Lullaby Quilts" which is a charity sub group of our guild.
 Shirlene also made this one for a baby shower she was going to the NEXT DAY!
 Another one of Shirlene's quilts- a Schnibbles quilt called Roundabouts.
 Cathie drafted this herself and made it from a Moda Jellyroll.
 This is another one of Cathie's.... a batik Rail Fence. Close- up below.
 Close-up of the Batik Rail Fence. The fabric selection is stunning!
 Diane made some cute smaller projects. She made a welcome banner and a snowman square....
 And a Fall wall hanging....
 .... and a redwork snowman (which I LOVE). Ahem... Diane.... did I ever tell you that I collect snowmen?
 Marla made an amazing tote bag. It's called the "Professional Tote". This thing is chock full of pockets.
 Muriel's blue and orange tessellations. The picture doesn't do this one justice.
 Jamie made this one for a friend, called Amish Boxes. Gorgeous!
 Betty made this Log Cabin for her grandchild. Lucky kid!
 Carolyn made this for her mother-in-law to use for her church raffle. She drafted it herself.
 This is one that Carolyn has as a UFO for a long time. She was happy to finish it. It was from a McCall's magazine.
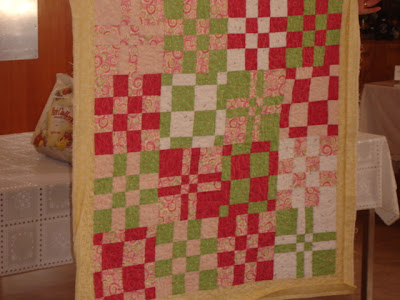 This is also Carolyn's.... super cute.
 Jean is a real "cut up" (look closer at her head). Here are some blocks made to start a One Block Wonder.
 Jean drafted this block and used it as a challenge for our guild's art quilt sub-group. It's called Jumpin' Java--- coffee cups blocks and the border is coffee label fabric.
 Jeans Convergence quilt. Stunning!
 Patty made these 2 quilts (above and below). Her sister got the blocks from a flea market. Some of the blocks are pieced and some are appliqued. Great find!

 This one is so cool... a very bright art quilt. Love the parrots!
 This one is mine. The flowers on the right and the koi in the circles along the bottom are fussy cut. Aside from mumbling to myself cutting out the flowers, it went together pretty fast. It's supposed to be a wall hanging but you need a huge wall to display it!
 I made this for my son. The border is license plates and the background is a map. I don't have it quilted yet, but I'm going to use license plates for the backing.
 Paula is just getting started here on an art quilt that she was commissioned to make. She's off to a good start!
 Polly made this cute lady bug quilt.
 .... And isn't this one eye-catching?
 ... And another one! She was on a roll!
 Julie organizes our retreats. She does a fantastic job! We all appreciate her hard work. Thanks, Julie!
 Julie designed this with EQ. She spent the weekend getting started on the blocks. Beautiful, Jullie!

 Bella was working on blocks for her Link to the 30's quilt. Nice block....
 Look how many she got done!
 And she worked on her Thimbleberries BOM.
 Carol holding a block for her "Take 5" pattern.
 And Carol with a pillowcase....
 ... And Carol with blocks for another quilt.
We have another retreat coming up in April. I can hardly wait!

On Sunday before we left, we had a "show and tell" and shared what we made. My apologies to a few of the ladies- I managed to accidentally delete a few pictures. If you're not on here, it isn't because I didn't like your quilt. It's because I was camera-challenged that day. My bad.


Gail's handiwork. Pretty colors!


We have another retreat coming up in April. I can hardly wait!

Subscribe to:
Posts (Atom)